You know React, you know create-react-app, but now you want to learn Webpack to create your own configurations and run React. In this tutorial, we will see the basics of Webpack for React to get you started, including React Router, React Fast Refresh, Code Splitting by Route and Vendor, production configuration, and more.
[topads][/topads]
Before we start, here’s the full list of features we are going to set up together in this tutorial:
- React 17
- React Fast Refresh
- React Router 5
- Webpack 5
- Semantic UI as the CSS Framework
- CSS Autoprefixer
- CSS Modules
- @babel/plugin-proposal-class-properties
- @babel/plugin-syntax-dynamic-import
- Code Splitting by Route and Vendor
- Webpack Bundle Analyzer
Pre-requisites
Have the following pre-installed:
And you should have at least some basic knowledge of React and React Router.
Note: You can use npm if you wish, although the commands will vary slightly.
Initial Dependencies
Let us start by creating our directory and package.json.
In your terminal type the following:
mkdir webpack-for-react && cd $_
yarn init -y
This first command will create our directory and move into it, then we initialize a package.json accepting defaults.
If you inspect it you will see the bare bones configuration:
{
  "name": "webpack-for-react",
  "version": "1.0.0",
  "main": "index.js",
  "license": "MIT"
}
Now we install our initial dependencies.
In your terminal type the following:
yarn add react react-dom prop-types react-router-dom semantic-ui-react semantic-ui-css

yarn add @babel/core babel-loader @babel/preset-env @babel/preset-react @babel/plugin-proposal-class-properties @babel/plugin-syntax-dynamic-import css-loader style-loader html-webpack-plugin webpack webpack-nano webpack-plugin-serve  -D
The development dependencies will only be used, as implied, during the development phase, and the production dependencies are what our application needs in production.
{
  "name": "webpack-for-react",
  "version": "1.0.0",
  "main": "index.js",
  "license": "MIT",
  "dependencies": {
    "react": "^17.0.1",,
    "react-dom": "^17.0.1",
    "prop-types": "^15.7.2",
    "react-router-dom": "^5.2.0",
    "semantic-ui-css": "^2.4.1",
    "semantic-ui-react": "^2.0.3"
  },
  "devDependencies": {
    "@babel/core": "^7.12.13",
    "@babel/plugin-proposal-class-properties": "^7.12.13",
    "@babel/plugin-syntax-dynamic-import": "^7.8.3",
    "@babel/preset-env": "^7.12.13",
    "@babel/preset-react": "^7.12.13",
    "css-loader": "^5.0.1",
    "html-webpack-plugin": "^5.0.0",
    "style-loader": "^2.0.0",
    "webpack": "^5.21.0",
    "webpack-nano": "^1.1.1",
    "webpack-plugin-serve": "^1.2.1"
  }
}
Note: Changes to previously created files will be highlighted.
Note: Dependencies versions might be different than yours from the time of this writing.
- react — I’m sure you know what React is
- react-dom — Provides DOM-specific methods for the browser
- prop-types — Runtime type checking for React props
- react-router-dom — Provides routing capabilities to React for the browser
- semantic-ui-react — CSS Framework
- @babel/core — Core dependencies for Babel
- Babel is a transpiler that compiles JavaScript ES6 to JavaScript ES5 allowing you to write JavaScript “from the future” so that current browsers will understand it. Detailed description in Quora.
- babel-loader — This package allows transpiling JavaScript files using Babel and webpack
- @babel/preset-env — With this you don’t have to specify if you will be writing ES2015, ES2016 or ES2017. Babel will automatically detect and transpile accordingly.
- @babel/preset-react — Tells Babel we will be using React
- @babel/plugin-proposal-class-properties — Use class properties. We don’t use Class Properties in this project, but you will more than likely use them in your project
- @babel/plugin-syntax-dynamic-import — Be able to use dynamic imports
- css-loader — Interprets
@importandurl()like import/require()and will resolve them - html-webpack-plugin — Can generate an HTML file for your application, or you can provide a template
- style-loader — Adds CSS to the DOM by injecting a
<style>tag - webpack — Module bundler
- webpack-nano — Webpack CLI
- webpack-plugin-serve — Provides a development server for your application
Setting up Babel
In the root directory (webpack-for-react) we create the Babel configuration file.
touch .babelrc
At this point you can open your favorite editor (mine is VS Code by the way), then point the editor to the root of this project and open .babelrc file and copy the following:
{
  "presets": [
    "@babel/preset-env",
    "@babel/preset-react"
  ],
  "plugins": [
    "@babel/plugin-syntax-dynamic-import",
    "@babel/plugin-proposal-class-properties"
  ]
}
This tells Babel to use the presets (plugins) we previously installed. Later when we call babel-loader from Webpack, this is where it will look to know what to do.
Setting up Webpack
Now the fun begins! Let’s create the Webpack configuration file.
In your terminal type the following:
touch webpack.config.js
Open webpack.config.js and copy the following:
const HtmlWebpackPlugin = require('html-webpack-plugin');
const { WebpackPluginServe } = require('webpack-plugin-serve');

const port = process.env.PORT || 3000;

module.exports = {
  // Webpack configuration goes here
};
This is the basic shell for Webpack. We require webpack, html-webpack-plugin and webpack-plugin-serve. Provide a default port if the environment variable PORT does not exist and export the module.
The following will be additions for webpack.config.js (one after another).
...
module.exports = {
  mode: 'development',
};
mode tells Webpack this configuration will be for either development or production. “Development Mode [is] optimized for speed and developer experience. production will give you a set of defaults useful for deploying your application (webpack 4: mode and optimization)”.
...
module.exports = {
  ...
  entry: ['./src/index.js', 'webpack-plugin-serve/client'],
  output: {
    filename: 'bundle.[fullhash].js',
  },
};
To get a running instance of Webpack we need:
entry— Specifies the entry point of your application; this is where your React app lives and where the bundling process will begin (Docs)
Webpack 4 introduced some defaults, so if you don’t include entry in your configuration, then Webpack will assume your entry point is located under the ./src directory, making entry optional as opposed to Webpack 3. For this tutorial, I have decided to leave entry as it makes it obvious where our entry point will be, but you are more than welcome to remove it if you so decide.
output— Tells Webpack how to write the compiled files to disk (Docs)filename— This will be the filename of the bundled application. The[fullhash]portion of the filename will be replaced by a hash generated by Webpack every time your application changes and is recompiled (helps with caching).
...
module.exports = {
  ...
  devtool: 'inline-source-map',
};
devtool will create source maps to help you with debugging of your application. There are several types of source maps and this particular map (inline-source-map) is to be used only in development. (Refer to the docs for more options).
...
module.exports = {
  ...
  module: {
    rules: [

      // First Rule
      {
        test: /\.(js)$/,
        exclude: /node_modules/,
        use: ['babel-loader'],
      },

      // Second Rule
      {
        test: /\.css$/,
        use: [
          {
            loader: 'style-loader',
            options: {
              esModule: true,
            },
          },
          {
            loader: 'css-loader',
            options: {
              esModule: true,
              modules: {
                mode: 'local',
                exportLocalsConvention: 'camelCaseOnly',
                namedExport: true,
              },
            },
          },
        ],
      },
    ],
  },
  watch: true,
};
- module — What types of modules your application will include, in our case we will support ESNext (Babel) and CSS Modules
- rules — How we handle each different type of module
First Rule
We test for files with a .js extension excluding the node_modules directory and use Babel, via babel-loader, to transpile down to vanilla JavaScript (basically, looking for our React files).
Remember our configuration in .babelrc? This is where Babel looks at that file.
Second Rule
We test for CSS files with a .css extension. Here we use two loaders, style-loader and css-loader, to handle our CSS files. Then we configure the loaders to use CSS Modules (esModule), camel case (exportLocalsConvention) and create source maps.
This gives us the ability to use import Styles from ‘./styles.css’ syntax (or destructuring like this import { style1, style2 } from ‘./styles.css’).
In the React app we would write something like this:
...
import Styles from ‘./styles.css’
<div className={Styles.style1}>Hello World</div>

// or with the destructuring syntax

import { style1, style2 } from ‘./styles.css’
<div className={style1}>Hello World</div>
...
Camel case gives us the ability to write our CSS rules like this:
.home-button {...}
And use it in our React app like this:
...
import { homeButton } from './styles.css'
...
...
module.exports = {
  ...
  plugins: [
    new HtmlWebpackPlugin({
      template: 'public/index.html',
      favicon: 'public/favicon.ico'
    }),
    new WebpackPluginServe({
      host: 'localhost',
      port: port,
      historyFallback: true,
      open: true,
      liveReload: false,
      hmr: true,
      static: './dist',
    }),
  ],
};
This section is where we configure (as the name implies) plugins.
HtmlWebpackPlugin (html-webpack-plugin) accepts an object with different options. In our case, we specify the HTML template we will be using and the favicon. (Refer to the docs for more options).
WebpackPluginServe (webpack-plugin-serve) as mentioned above, is a Webpack development server.
We specify localhost as the host and assign the variable port as the port (if you remember, we assigned port 3000 to this variable). We set historyApiFallbac to true and open to true. This will open the browser automatically and launch your application in http://localhost:3000. liveReload and hmr to enable Fast Refresh (we will configure later). Finally static sets the directory from which static files will be served from the root of the application.
Later we will be adding other plugins for Bundle Analyzer and Fast Refresh.
Now, below is the complete Webpack configuration. (webpack.config.js):
const HtmlWebpackPlugin = require('html-webpack-plugin');
const { WebpackPluginServe } = require('webpack-plugin-serve');

const port = process.env.PORT || 3000;

module.exports = {
  mode: 'development',
  entry: ['./src/index.js', 'webpack-plugin-serve/client'],
  output: {
    filename: 'bundle.[fullhash].js',
  },
  devtool: 'inline-source-map',
  module: {
    rules: [
      {
        test: /\.(js)$/,
        exclude: /node_modules/,
        use: ['babel-loader'],
      },
      {
        test: /\.css$/,
        use: [
          {
            loader: 'style-loader',
            options: {
              esModule: true,
            },
          },
          {
            loader: 'css-loader',
            options: {
              esModule: true,
              modules: {
                mode: 'local',
                exportLocalsConvention: 'camelCaseOnly',
                namedExport: true,
              },
            },
          },
        ],
      },
    ],
  },
  plugins: [
    new HtmlWebpackPlugin({
      template: 'public/index.html',
      favicon: 'public/favicon.ico',
    }),
    new WebpackPluginServe({
      host: 'localhost',
      port: port,
      historyFallback: true,
      open: true,
      liveReload: false,
      hmr: true,
      static: './dist',
    }),
  ],
  watch: true,
};
Creating the React App
We will be creating a simple Hello World app with three routes: a home, a page not found and a dynamic page that we will be loading asynchronously when we implement code splitting later.
Note: Assuming you have a basic understanding of React and React Router, I will not go into many details and only highlight what’s relevant to this tutorial.
We currently have the following project structure:
|-- node_modules
|-- .babelrc
|-- package.json
|-- webpack.config.js
|-- yarn.lock
In your terminal type the following:
mkdir public && cd $_
touch index.html
We create a public directory, move into it and also create an index.html file. Here is where we also have the favicon. You can grab it from here and copy it into public directory.
Open the index.html file and copy the following:
<!DOCTYPE html>
<html lang="en">

<head>
  <meta charset="UTF-8">
  <meta name="viewport" content="width=device-width, initial-scale=1.0">
  <meta http-equiv="X-UA-Compatible" content="ie=edge">
  <link async rel="stylesheet" href="//cdn.jsdelivr.net/npm/semantic-ui@2.4.2/dist/semantic.min.css" />
  <title>webpack-for-react</title>
</head>

<body>
  <div id="root"></div>
</body>

</html>
Nothing much here (just a standard HTML template) only, we are adding the Semantic UI stylesheet and also creating a div with an ID of root. This is where our React app will render.
Back to your terminal type the following:
cd ..
mkdir src && cd $_
touch index.js
Open index.js and copy the following:
import React from 'react';
import ReactDOM from 'react-dom';
import App from './components/App';

ReactDOM.render(<App />, document.getElementById('root'));
In your terminal type the following:
mkdir components && cd $_
touch App.js Layout.js Layout.css Home.js DynamicPage.js NoMatch.js
After creating the React component files, we have the following project structure:
|-- node_modules
|-- public
    |-- index.html
    |-- favicon.ico
|-- src
    |-- components
        |-- App.js
        |-- DynamicPage.js
        |-- Home.js
        |-- Layout.css
        |-- Layout.js
        |-- NoMatch.js
    |-- index.js
|-- .babelrc
|-- package.json
|-- webpack.config.js
|-- yarn.lock
Open App.js and copy the following:
import React from 'react';
import { Switch, BrowserRouter as Router, Route } from 'react-router-dom';

import Home from './Home';
import DynamicPage from './DynamicPage';
import NoMatch from './NoMatch';

const App = () => {
  return (
    <Router>
      <div>
        <Switch>
          <Route exact path="/" component={Home} />
          <Route exact path="/dynamic" component={DynamicPage} />
          <Route component={NoMatch} />
        </Switch>
      </div>
    </Router>
  );
};

export default App;
We create our basic “shell” with React Router and have a home, dynamic page and page not found route.
Open Layout.css and copy the following:
.pull-right {
  display: flex;
  justify-content: flex-end;
}
.h1 {
  margin-top: 10px !important;
  margin-bottom: 20px !important;
}
Open Layout.js and copy the following:
import React from 'react';
import { Link } from 'react-router-dom';
import { Header, Container, Divider, Icon } from 'semantic-ui-react';

import { pullRight, h1 } from './layout.css';

const Layout = ({ children }) => {
  return (
    <Container>
      <Link to="/">
        <Header as="h1" className={h1}>
          webpack-for-react
        </Header>
      </Link>
      {children}
      <Divider />
      <p className={pullRight}>
        Made with <Icon name="heart" color="red" /> by Esau Silva
      </p>
    </Container>
  );
};

export default Layout;
This is our container component where we define the layout of the site. Making use of CSS Modules, we are importing two CSS rules from layout.css. Also notice how we are using camel case for pullRight.
Open Home.js and copy the following:
import React from 'react';
import { Link } from 'react-router-dom';

import Layout from './Layout';

const Home = () => {
  return (
    <Layout>
      <p>Hello World of React and Webpack!</p>
      <p>
        <Link to="/dynamic">Navigate to Dynamic Page</Link>
      </p>
    </Layout>
  );
};

export default Home;
Open DynamicPage.js and copy the following:
import React from 'react';
import { Header } from 'semantic-ui-react';

import Layout from './Layout';

const DynamicPage = () => {
  return (
    <Layout>
      <Header as="h2">Dynamic Page</Header>
      <p>This page was loaded asynchronously!!!</p>
    </Layout>
  );
};

export default DynamicPage;
Open NoMatch.js and copy the following:
import React from 'react';
import { Icon, Header } from 'semantic-ui-react';

import Layout from './Layout';

const NoMatch = () => {
  return (
    <Layout>
      <Icon name="minus circle" size="big" />
      <strong>Page not found!</strong>
    </Layout>
  );
};

export default NoMatch;
We are done creating the React components. For a final step before running our application, open package.json:
{
  "name": "webpack-for-react",
  "version": "1.0.0",
  "main": "index.js",
  "license": "MIT",
  "scripts": {
    "start": "wp"
  },
  "dependencies": {
    "react": "^17.0.1",,
    "react-dom": "^17.0.1",
    "prop-types": "^15.7.2",
    "react-router-dom": "^5.2.0",
    "semantic-ui-css": "^2.4.1",
    "semantic-ui-react": "^2.0.3"
  },
  "devDependencies": {
    "@babel/core": "^7.12.13",
    "@babel/plugin-proposal-class-properties": "^7.12.13",
    "@babel/plugin-syntax-dynamic-import": "^7.8.3",
    "@babel/preset-env": "^7.12.13",
    "@babel/preset-react": "^7.12.13",
    "css-loader": "^5.0.1",
    "html-webpack-plugin": "^5.0.0",
    "style-loader": "^2.0.0",
    "webpack": "^5.21.0",
    "webpack-nano": "^1.1.1",
    "webpack-plugin-serve": "^1.2.1"
  }
}
We add the scripts key and also the start key. This will allow us to run React with the Webpack Development Server. If you don’t specify a configuration file, webpack-plugin-serve will look for webpack.config.js file as the default configuration entry within the root directory.
Before we run the app, copy the favicon.ico and place it under the public directory.
Now the moment of truth! Type the following in your terminal (remember to be in the root directory) and Yarn will call our start script.
yarn start

Now we have a working React app powered by our own Webpack configuration. Notice at the end of the GIF I am highlighting the bundled JavaScript file Webpack generated for us, and as we indicated in the configuration, the filename has a unique hash, main.d505bbab002262a9bc07.js.
Setting up Fast Refresh
From the root directory, add the following two packages:
yarn add @pmmmwh/react-refresh-webpack-plugin react-refresh -D
- @pmmmwh/react-refresh-webpack-plugin – Webpack plugin to enable “Fast Refresh”
- react-refresh – Implements the wiring necessary to integrate Fast Refresh
Open webpack.config.jsand add the highlighted lines (some code omitted for brevity)
const ReactRefreshWebpackPlugin = require('@pmmmwh/react-refresh-webpack-plugin');

module.exports = {
  ...
  module: {
    rules: [
      {
        test: /\.(js)$/,
        exclude: /node_modules/,
        use: [
          {
            loader: 'babel-loader',
            options: {
              plugins: [require('react-refresh/babel')].filter(Boolean),
            },
          },
        ],
      },
    ]
  }
  ...
  plugins: [
    new ReactRefreshWebpackPlugin({
      overlay: { sockIntegration: 'wps' },
    }),
  ]
}
Now we are ready to test Fast Refresh! Back in the terminal run your app, make a change and watch as the app updates without a full-page refresh.
yarn start
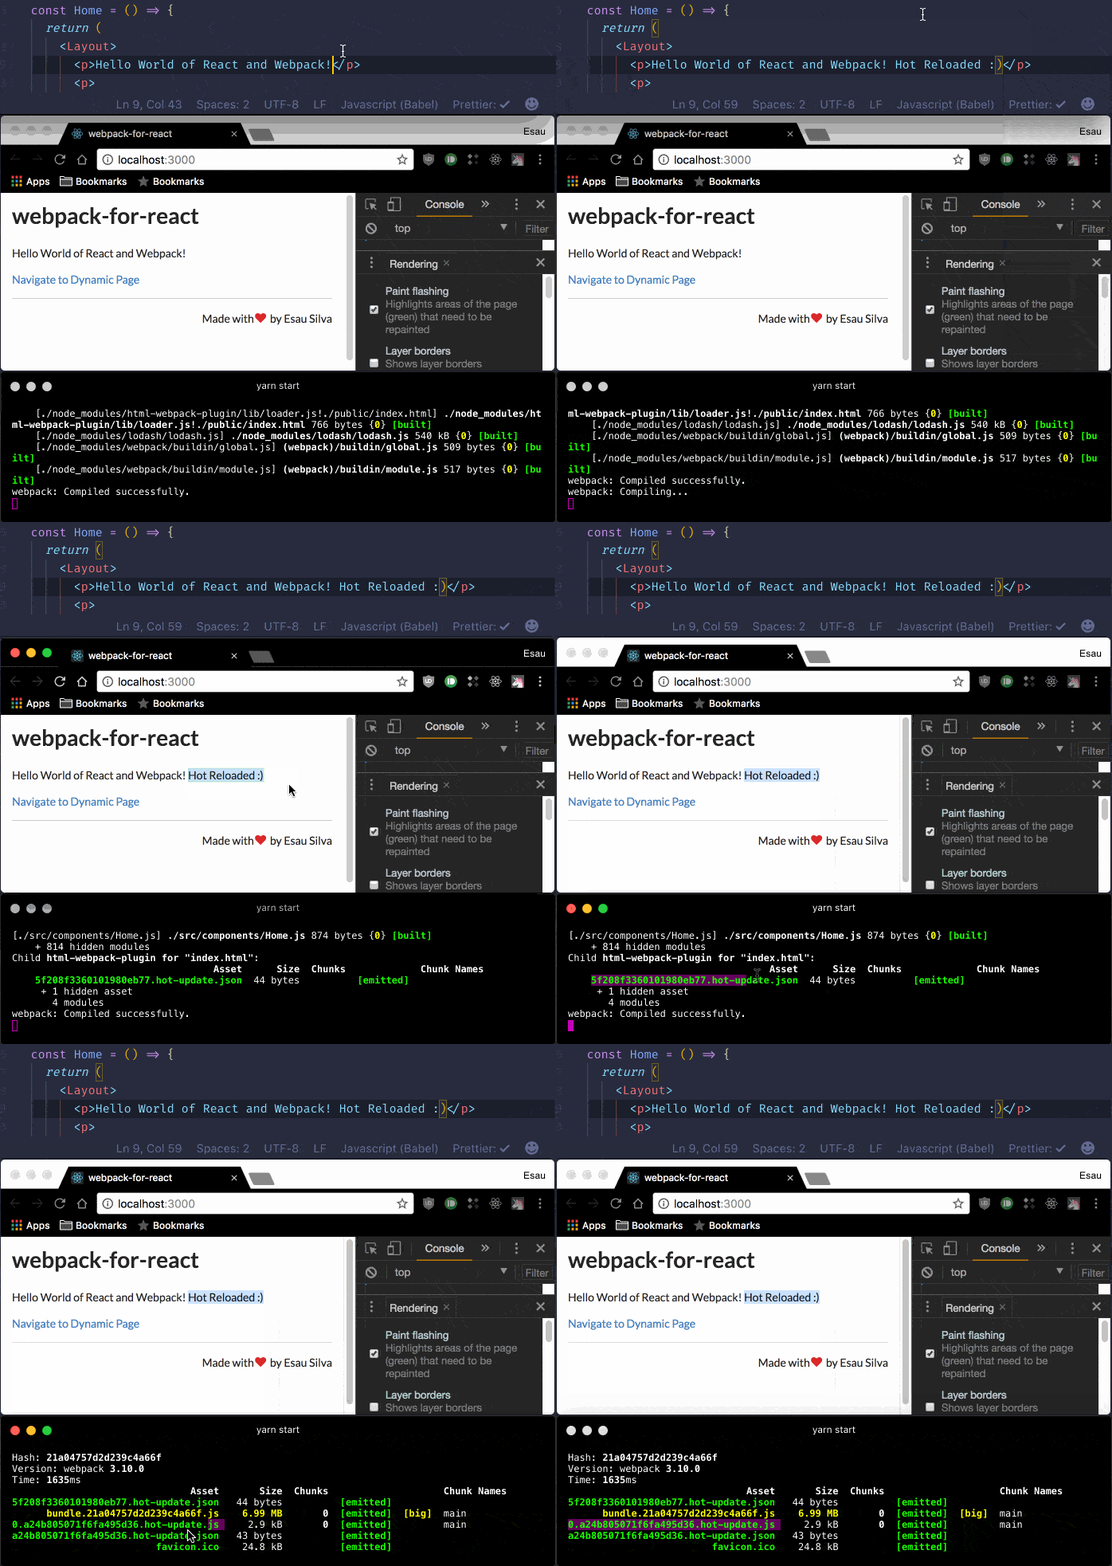
After updating the file, the page changes without a full refresh. To show this change in the browser I select Rendering -> Paint flashing in Chrome DevTools, which highlights the areas of the page, in green, that changed. I also highlight in Terminal the change Webpack sent to the browser to make this happen.
[signupform][/signupform]
Code Splitting
With code splitting, instead of having your application in one big bundle, you can have multiple bundles each loading asynchronously or in parallel. Also you can separate vendor code from you app code which can potentially decrease loading time.
By Route
There are several ways we can achieve code splitting by route, however in our case we will be using react-imported-component.
We would also like to show a loading spinner when the user navigates to a different route. This is a good practice as we don’t want the user to just stare at a blank screen while he/she waits for the new page to load. So, we will be creating a Loading component.
However, if the new page loads really fast, we don’t want the user to see a flashing loading spinner for a couple of milliseconds, so we will delay the Loading component by 300 milliseconds. To achieve this, we will be using React-Delay-Render.
Start by installing the two additional dependencies.
In your terminal type the following:
yarn add react-imported-component react-delay-render
Now we are going to create the Loading components.
In your terminal type the following:
touch ./src/components/Loading.js
Open Loading.js and copy the following:
import React from 'react';
import { Loader } from 'semantic-ui-react';
import ReactDelayRender from 'react-delay-render';

const Loading = () => <Loader active size="massive" />;

export default ReactDelayRender({ delay: 300 })(Loading);
Now that we have the Loading component, open App.js and modify it as follows:
import React from 'react';
import { Switch, BrowserRouter as Router, Route } from 'react-router-dom';
import importedComponent from 'react-imported-component';

import Home from './Home';
import Loading from './Loading';

const AsyncDynamicPAge = importedComponent(
  () => import(/* webpackChunkName:'DynamicPage' */ './DynamicPage'),
  {
    LoadingComponent: Loading
  }
);
const AsyncNoMatch = importedComponent(
  () => import(/* webpackChunkName:'NoMatch' */ './NoMatch'),
  {
    LoadingComponent: Loading
  }
);

const App = () => {
  return (
    <Router>
      <div>
        <Switch>
          <Route exact path="/" component={Home} />
          <Route exact path="/dynamic" component={AsyncDynamicPAge} />
          <Route component={AsyncNoMatch} />
        </Switch>
      </div>
    </Router>
  );
};

export default App;
This will create three bundles, or chunks, one for the DynamicPage component, one for the NoMatch component, and one for the main app.
Let’s also change the bundle filename. Open webpack.config.js and change it as follows:
...
module.exports = {
  ...
  output: {
    filename: '[name].[fullhash].js',
    ...
  },
}
It is time to run the app and take a look at code splitting by route in action.
yarn start

In the GIF, I first highlight the three different chunks created by Webpack in terminal. Then I highlight that upon the app launching, only the main chuck was loaded. Finally, we see that upon clicking Navigate to Dynamic Page the chunk corresponding to this page loaded asynchronously.
We also see that the chunk corresponding to the page not found was never loaded, saving the user bandwidth.
By Vendor
Now let’s split the application by vendor. We will be looking at splitting Semantic UI from the main app and into its own chunk. We will be using the SplitChunksPlugin.
Open webpack.config.js and make the following changes:
...
module.exports = {
  ...
  optimization: {
    splitChunks: {
      cacheGroups: {
        vendor: {
          chunks: 'initial',
          test: /[\\/]node_modules[\\/]semantic-ui-([\S]+)[\\/]/,
          name: 'vendor',
          enforce: true,
        },
      },
    },
  },
  ...
};
optimization.splitChunks— Here we separate Semantic UI (/[\/]node_modules[\/]semantic-ui-([\S]+)[\/]/), name the chunk and name the chunkvendor- Note: If you wanted to extract all third party packages into a separate chunk, use
/[\/]node_modules[\/]/
- Note: If you wanted to extract all third party packages into a separate chunk, use
In the terminal, launch the app:
yarn start
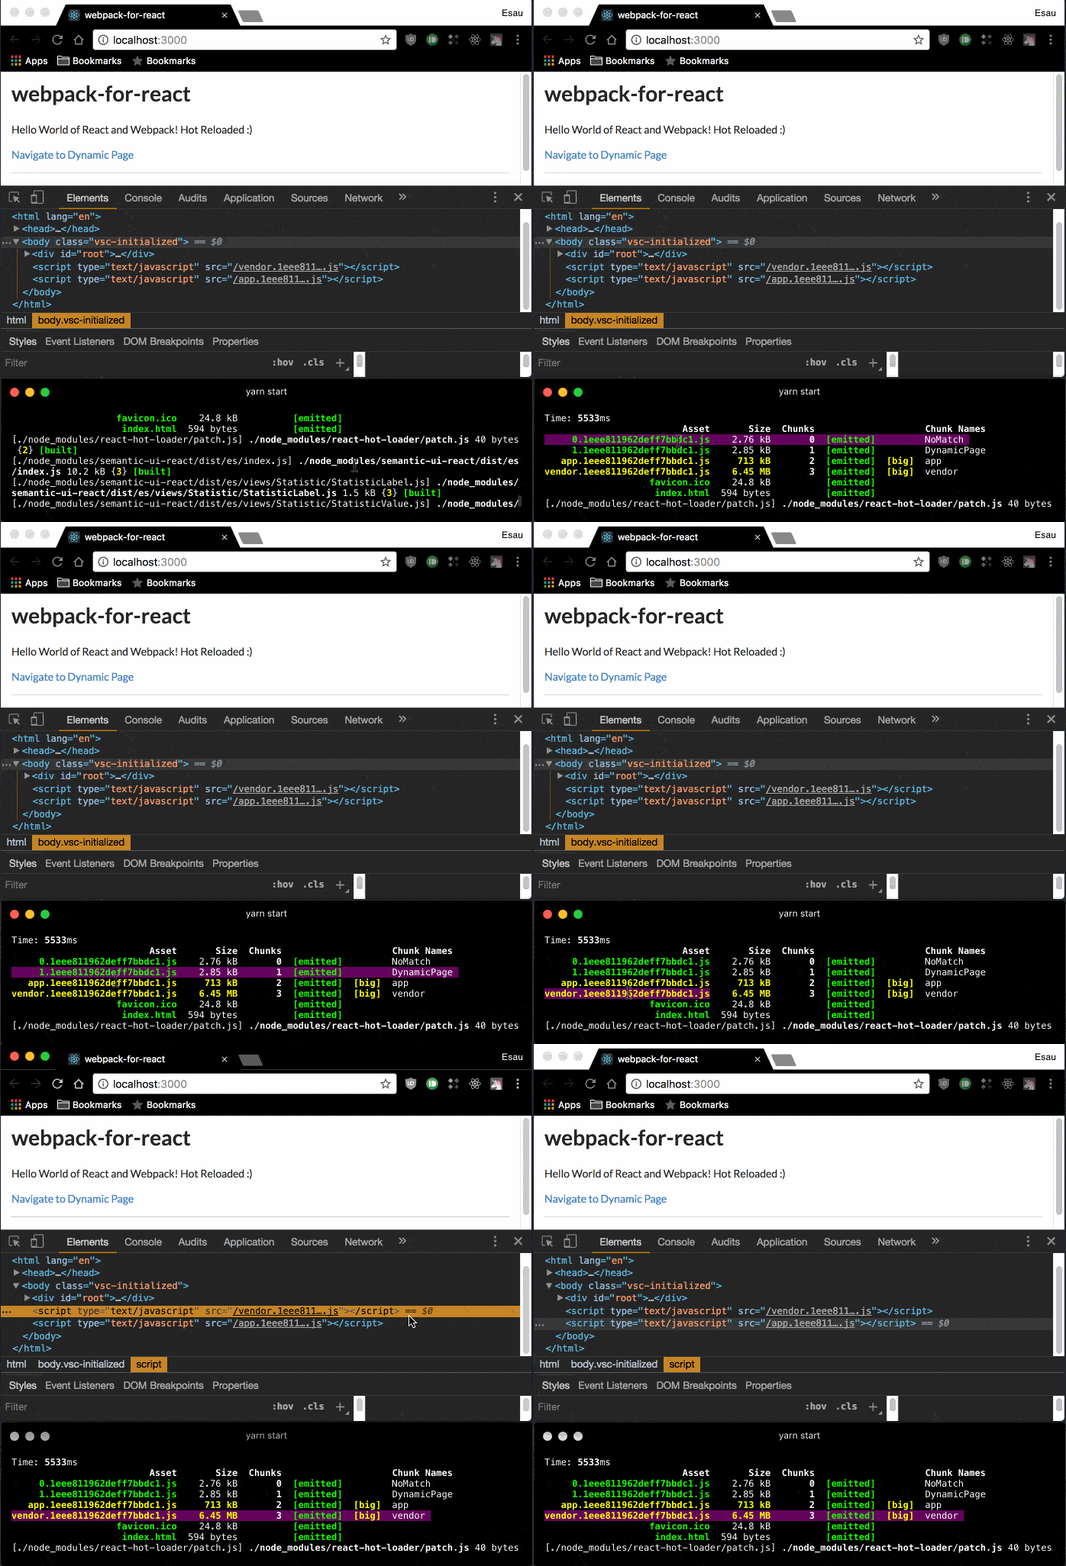
In terminal, I highlight the three previous chunks plus the new vendor chunk. Then when we inspect the HTML we see that both vendor and app chunks were loaded.
Since we have made several updates to our Webpack configuration, below you will find the complete webpack.config.js file.
const HtmlWebpackPlugin = require('html-webpack-plugin');
const { WebpackPluginServe } = require('webpack-plugin-serve');
const ReactRefreshWebpackPlugin = require('@pmmmwh/react-refresh-webpack-plugin');

const port = process.env.PORT || 3000;

module.exports = {
  mode: 'development',
  entry: ['./src/index.js', 'webpack-plugin-serve/client'],
  output: {
    filename: '[name].[fullhash].js',
  },
  devtool: 'inline-source-map',
  module: {
    rules: [
      {
        test: /\.(js)$/,
        exclude: /node_modules/,
        use: [
          {
            loader: 'babel-loader',
            options: {
              plugins: [require('react-refresh/babel')].filter(Boolean),
            },
          },
        ],
      },
      {
        test: /\.css$/,
        use: [
          {
            loader: 'style-loader',
            options: {
              esModule: true,
            },
          },
          {
            loader: 'css-loader',
            options: {
              esModule: true,
              modules: {
                mode: 'local',
                exportLocalsConvention: 'camelCaseOnly',
                namedExport: true,
              },
            },
          },
        ],
      },
    ],
  },
  optimization: {
    splitChunks: {
      cacheGroups: {
        vendor: {
          chunks: 'initial',
          test: /[\\/]node_modules[\\/]semantic-ui-([\S]+)[\\/]/,
          name: 'vendor',
          enforce: true,
        },
      },
    },
  },
  plugins: [
    new ReactRefreshWebpackPlugin({
      overlay: { sockIntegration: 'wps' },
    }),
    new HtmlWebpackPlugin({
      template: 'public/index.html',
      favicon: 'public/favicon.ico',
    }),
    new WebpackPluginServe({
      host: 'localhost',
      port: port,
      historyFallback: true,
      open: true,
      liveReload: false,
      hmr: true,
      static: './dist',
    }),
  ],
  watch: true,
};
Production Configuration
Rename the Webpack configuration from webpack.config.js to webpack.config.development.js. Then make a copy and name it webpack.config.production.js.
In your terminal type the following:
mv webpack.config.js webpack.config.development.js
cp webpack.config.development.js webpack.config.production.js
We will need a development dependency, mini-css-extract-plugin. From their docs: “It moves all the required *.css modules in entry chunks into a separate CSS file. So, your styles are no longer inlined into the JS bundle, but in a separate CSS file (styles.css). If your total stylesheet volume is big, it will be faster because the CSS bundle is loaded in parallel to the JS bundle.”
In your terminal type the following:
yarn add mini-css-extract-plugin -D
Open webpack.config.production.js and make the following highlighted changes:
Doing something different here…I will add explanations with inline comments.
const path = require('path');
const HtmlWebpackPlugin = require('html-webpack-plugin');
const MiniCssExtractPlugin = require('mini-css-extract-plugin');

module.exports = {
  mode: 'production',
  entry: {
    app: './src/index.js',
  },
  output: {
    // We want to create the JavaScript bundles under a
    // 'static' directory
    filename: 'static/[name].[fullhash].js',

    // Absolute path to the desired output directory. In our
    //case a directory named 'dist'
    // '__dirname' is a Node variable that gives us the absolute
    // path to our current directory. Then with 'path.resolve' we
    // join directories
    // Webpack 4 assumes your output path will be './dist' so you
    // can just leave this
    // entry out.
    path: path.resolve(__dirname, 'dist'),

    publicPath: '/',
  },

  // Change to production source maps
  devtool: 'source-map',

  module: {
    rules: [
      {
        test: /\.(js)$/,
        exclude: /node_modules/,
        use: ['babel-loader'],
      },
      {
        test: /\.css$/,

        use: [
          {
            // We configure 'MiniCssExtractPlugin'
            loader: MiniCssExtractPlugin.loader,
            options: {
              esModule: true,
            },
          },
          {
            loader: 'css-loader',
            options: {
              // Allows to configure how many loaders
              // before css-loader should be applied
              // to @import(ed) resources
              importLoaders: 1,

              // Create source maps for CSS files
              sourceMap: true,

              esModule: true,
              modules: {
                mode: 'local',
                exportLocalsConvention: 'camelCaseOnly',
                namedExport: true,
              },
            },
          },
          {
            // PostCSS will run before css-loader and will
            // minify and autoprefix our CSS rules.
            loader: 'postcss-loader',
          },
        ],
      },
    ],
  },
  optimization: {
    splitChunks: {
      cacheGroups: {
        vendor: {
          chunks: 'initial',
          test: /[\\/]node_modules[\\/]semantic-ui-([\S]+)[\\/]/,
          name: 'vendor',
          enforce: true,
        },
      },
    },
  },
  plugins: [
    new HtmlWebpackPlugin({
      template: 'public/index.html',
      favicon: 'public/favicon.ico',
    }),

    // Create the stylesheet under 'styles' directory
    new MiniCssExtractPlugin({
      filename: 'styles/[name].[fullhash].css',
    }),
  ],
};
Notice we removed the port variable, the plugins related to Fast Refresh and the Development Server.
Also since we added PostCSS to the production configuration, we need to install it and create a configuration file for it.
In your terminal type the following:
yarn add postcss postcss-loader autoprefixer cssnano postcss-preset-env -D
touch postcss.config.js
Open postcss.config.js and copy the following:
const postcssPresetEnv = require('postcss-preset-env');
module.exports = {
  plugins: [
    postcssPresetEnv({
      browsers: ['>0.25%', 'not ie 11', 'not op_mini all']
    }),
    require('cssnano')
  ]
};
Here we are specifying what browsers we want autoprefixer (Refer to the Docs for more options) to support and minifying the CSS output.
Now for the last step before we create our production build, we need to create a build script in package.json.
Open the file and make the following changes to the scripts section:
...
"scripts": {
  "dev": "wp --config webpack.config.development.js",
  "prebuild": "rimraf dist",
  "build": "cross-env NODE_ENV=production wp --config webpack.config.production.js"
},
...
First thing to notice here is that we changed the start script from start to dev, then we added two additional scripts, prebuild and build.
Finally, we are indicating which configuration to use when in development or production.
prebuild— Will run before the build script and delete thedistdirectory created by our last production build. We use the library rimraf for thisbuild— First we use cross-env library just in case somebody is using Windows. This way setting up environment variables withNODE_ENVwill work and finally we specify the production configuration.
In your terminal install the two new dependencies we included in package.json:
yarn add rimraf cross-env -D
Before creating the production build, let us look at our new project structure:
|-- node_modules
|-- public
    |-- index.html
    |-- favicon.ico
|-- src
    |-- components
        |-- App.js
        |-- DynamicPage.js
        |-- Home.js
        |-- Layout.css
        |-- Layout.js
        |-- Loading.js
        |-- NoMatch.js
    |-- index.js
|-- .babelrc
|-- package.json
|-- postcss.config.js
|-- webpack.config.development.js
|-- webpack.config.production.js
|-- yarn.lock
At last we can create our production bundle.
In your terminal type the following:
yarn build
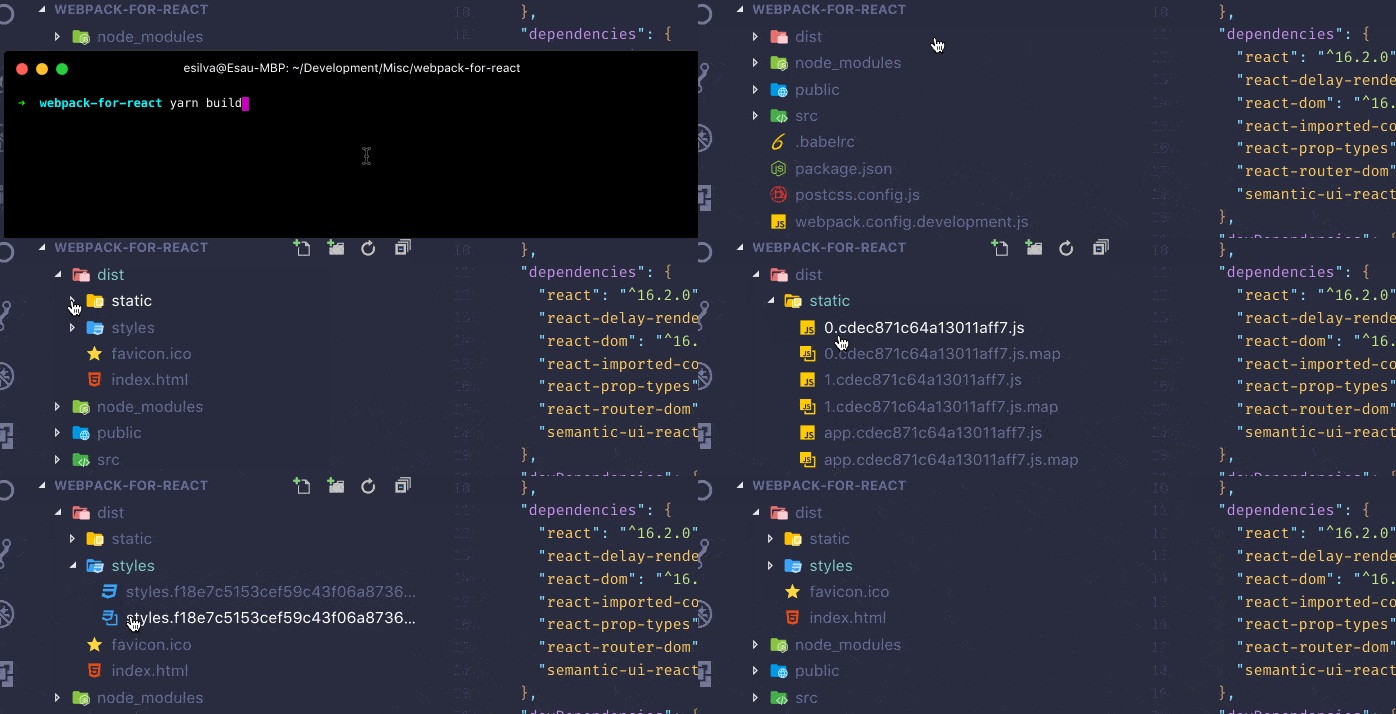
As you noticed, after we ran the build script, Webpack created a dist directory containing our production ready app. Now inspect the files that were created and notice they are minified and each has a corresponding source map. You will also notice PostCSS has added autoprefixing to the CSS file.
Now we take our production files and fire up a Node server to serve our site, and this is the result:
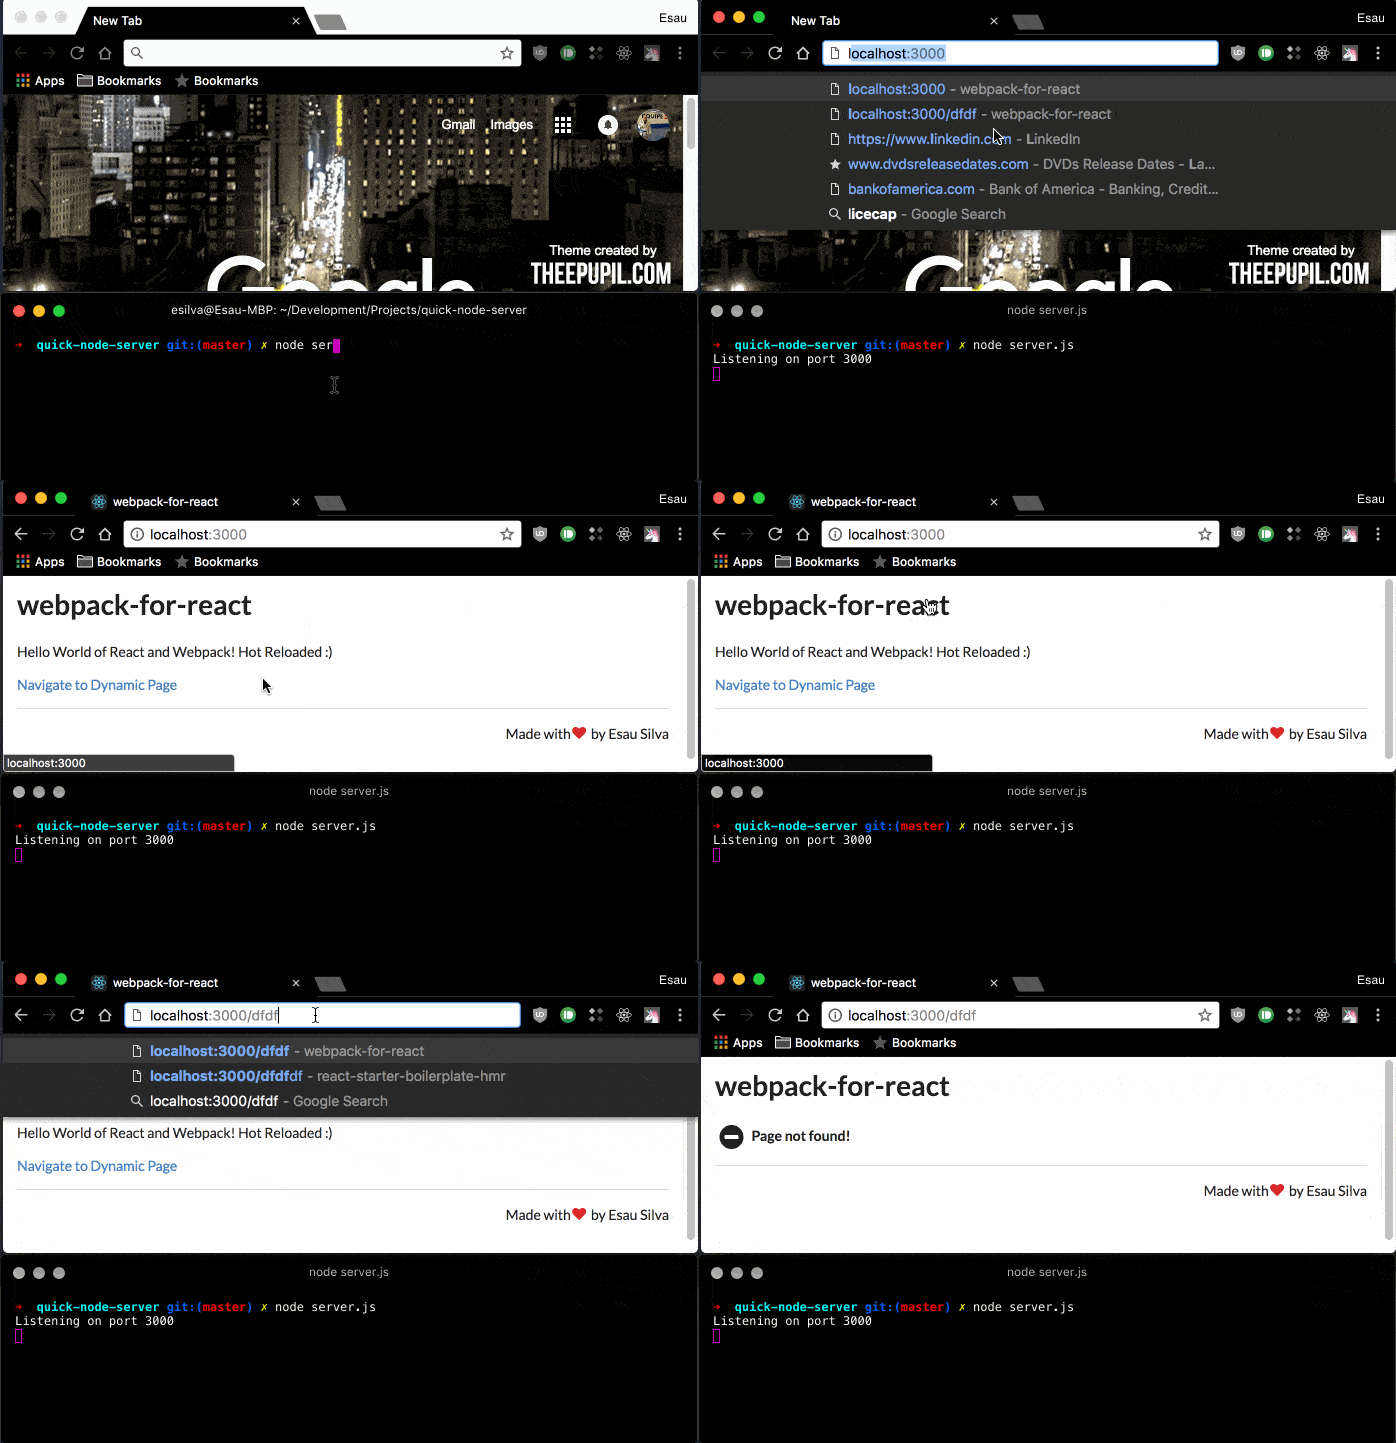
Note: I am using this server in the GIF above to serve our production files.
At this point we have two working Webpack configurations, one for development and one for production. However, since both configurations are very similar, they share many of the same settings. If we wanted to add something else, we would have to add it to both configurations files. Let’s fix this inconvenience.
Webpack Composition
Let’s start by installing webpack-merge and Chalk as development dependencies.
In your terminal type the following:
yarn add webpack-merge chalk -D
We will also need a couple of new directories and a few new files.
In your terminal type the following:
mkdir -p build-utils/addons
cd build-utils
touch build-validations.js common-paths.js webpack.common.js webpack.dev.js webpack.prod.js
Now let’s look at our new project structure:
|-- build-utils
    |-- addons
    |-- build-validations.js
    |-- common-paths.js
    |-- webpack.common.js
    |-- webpack.dev.js
    |-- webpack.prod.js
|-- node_modules
|-- public
    |-- index.html
    |-- favicon.ico
|-- src
    |-- components
        |-- App.js
        |-- DynamicPage.js
        |-- Home.js
        |-- Layout.css
        |-- Layout.js
        |-- Loading.js
        |-- NoMatch.js
    |-- index.js
|-- .babelrc
|-- package.json
|-- postcss.config.js
|-- webpack.config.development.js
|-- webpack.config.production.js
|-- yarn.lock
Open common-paths.js and copy the following:
const path = require('path');
const PROJECT_ROOT = path.resolve(__dirname, '../');

module.exports = {
  projectRoot: PROJECT_ROOT,
  outputPath: path.join(PROJECT_ROOT, 'dist'),
  appEntry: path.join(PROJECT_ROOT, 'src')
};
Here we define, as the name implies, the common paths for our Webpack configurations. PROJECT_ROOT needs to look one directory up as we are working under build-utils directory (one level down from the actual root path in our project).
Open build-validations.js and copy the following:
const chalk = require('chalk');

const ERR_NO_ENV_FLAG = chalk.red(
  `You must pass an '--env [dev|prod]' flag into your build for webpack to work!`
);

module.exports = { ERR_NO_ENV_FLAG };
Later when we modify our package.json we will be requiring --env flag in the scripts. These validations are to verify that the flag is present; if not, it will throw an error.
In the next three files, we will be separating the Webpack configurations into configurations that are shared among development and production, configurations that are only for development and configurations only for production.
Open webpack.common.js and copy the following:
const commonPaths = require('./common-paths');

const HtmlWebpackPlugin = require('html-webpack-plugin');

const config = {
  output: {
    path: commonPaths.outputPath,
    publicPath: '/',
  },
  target: 'web',
  optimization: {
    splitChunks: {
      cacheGroups: {
        vendor: {
          chunks: 'initial',
          test: /[\\/]node_modules[\\/]semantic-ui-([\S]+)[\\/]/,
          name: 'vendor',
          enforce: true,
        },
      },
    },
  },
  plugins: [
    new HtmlWebpackPlugin({
      template: `public/index.html`,
      favicon: `public/favicon.ico`,
    }),
  ],
};

module.exports = config;
We basically extracted out what was shared among webpack.config.development.js and webpack.config.production.js and transferred it to this file. At the top we require common-paths.js to set the output.path.
Open webpack.dev.js and copy the following:
const commonPaths = require('./common-paths');

const ReactRefreshWebpackPlugin = require('@pmmmwh/react-refresh-webpack-plugin');
const { WebpackPluginServe: Serve } = require('webpack-plugin-serve');

const port = process.env.PORT || 3000;

const config = {
  mode: 'development',
  entry: {
    app: [`${commonPaths.appEntry}/index.js`, 'webpack-plugin-serve/client'],
  },
  output: {
    filename: '[name].[fullhash].js',
  },
  devtool: 'inline-source-map',
  module: {
    rules: [
      {
        test: /\.(js)$/,
        exclude: /node_modules/,
        use: [
          {
            loader: 'babel-loader',
            options: {
              plugins: [require('react-refresh/babel')].filter(Boolean),
            },
          },
        ],
      },
      {
        test: /\.css$/,
        use: [
          {
            loader: 'style-loader',
            options: {
              esModule: true,
            },
          },
          {
            loader: 'css-loader',
            options: {
              esModule: true,
              modules: {
                mode: 'local',
                exportLocalsConvention: 'camelCaseOnly',
                namedExport: true,
              },
            },
          },
        ],
      },
    ],
  },
  plugins: [
    new ReactRefreshWebpackPlugin({
      overlay: { sockIntegration: 'wps' },
    }),
    new Serve({
      historyFallback: true,
      liveReload: false,
      hmr: true,
      host: 'localhost',
      port: port,
      open: true,
      static: commonPaths.outputPath,
    }),
  ],
  watch: true,
};

module.exports = config;
This is the same concept as with the previous file. Here we extracted out development only configurations.
Open webpack.prod.js and copy the following:
const commonPaths = require('./common-paths');

const MiniCssExtractPlugin = require('mini-css-extract-plugin');

const config = {
  mode: 'production',
  entry: {
    app: [`${commonPaths.appEntry}/index.js`],
  },
  output: {
    filename: 'static/[name].[fullhash].js',
  },
  devtool: 'source-map',
  module: {
    rules: [
      {
        test: /\.(js)$/,
        exclude: /node_modules/,
        use: ['babel-loader'],
      },
      {
        test: /\.css$/,
        use: [
          {
            loader: MiniCssExtractPlugin.loader,
            options: {
              esModule: true,
            },
          },
          {
            loader: 'css-loader',
            options: {
              importLoaders: 1,
              sourceMap: true,
              esModule: true,
              modules: {
                mode: 'local',
                exportLocalsConvention: 'camelCaseOnly',
                namedExport: true,
              },
            },
          },
          {
            loader: 'postcss-loader',
          },
        ],
      },
    ],
  },
  plugins: [
    new MiniCssExtractPlugin({
      filename: 'styles/[name].[fullhash].css',
    }),
  ],
};

module.exports = config;
We extracted out production only configurations.
Now that we have the shared configurations and the ones specific for development and production in separate files, it is time to put everything together.
In terminal, if you are still in build-utils directory, go up one level to the root of the project, then delete the previous Webpack configurations and create a new Webpack configuration. Name it webpack.config.js.
In your terminal type the following:
cd ..
rm webpack.config.development.js webpack.config.production.js
touch webpack.config.js
Before configuring webpack.config.js, let’s open package.json and update the scripts section.
Modify the section as follows:
...
"scripts": {
  "dev": "yarn prebuild && wp --env dev",
  "prebuild": "rimraf dist",
  "build": "cross-env NODE_ENV=production wp --env prod"
},
...
Since we removed the –config flag, Webpack will now be looking for the default configuration, which is webpack.config.js.
We also take advantage of webpack-nano‘s custom flags and create -env flag, which we will be reading in our Webpack configuration to distinguish between development or production configurations.
Open webpack.config.js and copy the following:
Explanations with inline comments.
const buildValidations = require('./build-utils/build-validations');
const commonConfig = require('./build-utils/webpack.common');
const argv = require('webpack-nano/argv');
const { merge } = require('webpack-merge');

// We can include Webpack plugins, through addons, that do
// not need to run every time we are developing.
// We will see an example when we set up 'Bundle Analyzer'
const addons = (/* string | string[] */ addonsArg) => {
  let addons = Array.isArray(addonsArg)
    ? addonsArg.filter((item) => item !== true)
    : [addonsArg].filter(Boolean);

  return addons.map((addonName) =>
    require(`./build-utils/addons/webpack.${addonName}.js`)
  );
};

module.exports = () => {
  // This is where we read the custom flag rom 'scripts'
  // section in 'package.json'.
  const { env, addons: addonsArg } = argv;

  if (!env) {
    throw new Error(buildValidations.ERR_NO_ENV_FLAG);
  }

  // Select which Webpack configuration to use; development
  // or production
  const envConfig = require(`./build-utils/webpack.${env}.js`);

  // 'webpack-merge' will combine our shared configurations, the
  // environment specific configurations and any addons we are
  // including
  const mergedConfig = merge(commonConfig, envConfig, ...addons(addonsArg));

  return mergedConfig;
};
Now, this might seem like a lot of setup, but in the long run, it will come in handy.
At this time, you can launch the application or build the production files, and everything will function as expected (sorry, no GIF this time).
yarn dev
yarn build
Note: This “Webpack Composition” technique was taken from Webpack Academy, a free course by Sean Larkin which I recommend taking to learn more about Webpack, not specific to React.
BONUS: Setting up Webpack Bundle Analyzer
You don’t necessarily need Webpack Bundle Analyzer, but it does comes in handy when trying to optimize your builds.
Start by installing the dependency and creating the configuration file.
In your terminal type the following:
yarn add webpack-bundle-analyzer -D
touch build-utils/addons/webpack.bundleanalyzer.js
Open webpack.bundleanalyzer.js and copy the following:
const BundleAnalyzerPlugin = require('webpack-bundle-analyzer')
  .BundleAnalyzerPlugin;

module.exports = {
  plugins: [
    new BundleAnalyzerPlugin({
      analyzerMode: 'server'
    })
  ]
};
We are just exporting the plugins section, which includes Bundle Analyzer, for Webpack. Then webpack-merge will combine it into the final Webpack configuration. Remember the addons in webpack.config.js? Well, this is where it comes into place.
For the final step, let’s open package.json and include the new scripts as follows:
"scripts": {
  "dev": "yarn prebuild && wp --env dev",
  "dev:bundleanalyzer": "yarn prebuild && yarn dev --addons bundleanalyzer",
  "prebuild": "rimraf dist",
  "build": "cross-env NODE_ENV=production wp --env prod",
  "build:bundleanalyzer": "yarn build --addons bundleanalyzer"
},
dev:bundleanalyzer— Calls thedevscript and passes a new environment variableaddons=bundleanalyzerbuild:bundleanalyzer— Calls thebuildscript and passes a new environment variableaddons=bundleanalyzer
Time to run the app with the bundle analyzer addon.
In your terminal type the following:
yarn dev:bundleanalyzer
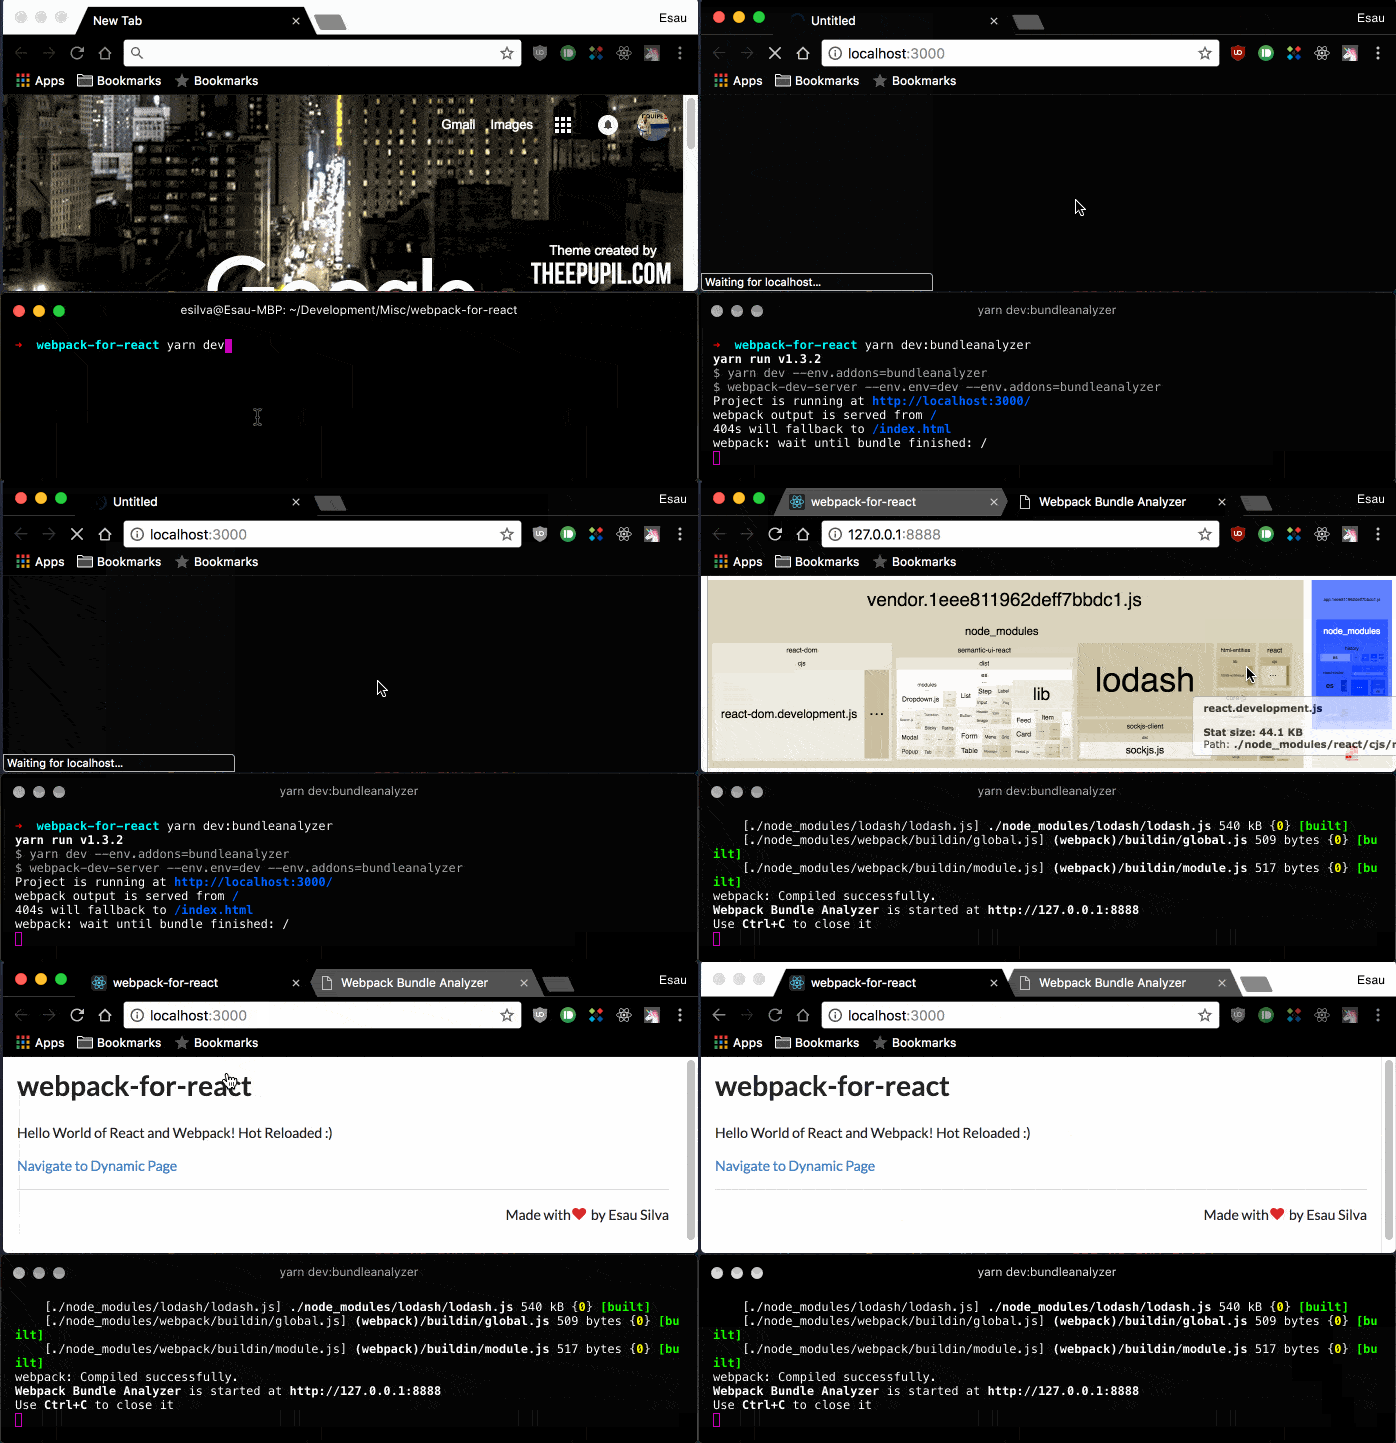
The application launches alongside Webpack Bundle Analyzer.
Including addons with Webpack Composition can be very useful, as there are many plugins that you would want to use only at certain times.
Conclusion
First of all, you can get the full code on the GitHub repository.
Well, you made it to the end. Congratulations!! ? Now that you know the basics (and a little more) of Webpack for React, you can go ahead and keep exploring and learning more advanced features and techniques.
Thank you for reading and I hope you enjoyed it. If you have any questions, suggestions or corrections let me know in the comments below. Don’t forget to give this article a Share and some Claps ??.
You can follow me on Twitter, GitHub, LinkedIn or all of them.
Consider giving back by getting me a coffee (or a couple) by clicking the following button:
[bottomads][/bottomads]
Really Good one.. !! Solve almost every issues.
Just want to know is there any article same for Server side rendering with React.
There are other but most of them are not compatible with Babel7 /webpack 4.
It would be really help you write or share any code base for understanding SSR on react.
Thank you very much! You save me a lot of headache and time Work like a charm!
Why can’t babel read the jsconfig file ?
Thank you! You can use .babelrc to configure Babel, alternatively, you can use your package.json file for the configurations. In Babel 7 they introduced a new Project-Wide configuration, you can read more about it here
Lovely, keep going.