You have heard a lot about Vue.js and how awesome it is, and now you want to use it with your next .NET Core app. Well, it is far easier than you might think.
In this tutorial, besides getting started with Vue.js, we will cover the following:
- SASS compilation
- ES6+ JavaScript transpilation to ES5 with Babel
- CSS Autoprefixing with PostCSS
- Minification of our CSS and JS assets
[topads][/topads]
Since this is an introductory Vue.js tutorial, we will be building a simple feedback form that will include full name, email and a comments box.
Setting up the project
Open Visual Studio and create a new project by pressing Ctrl + Shift + N or navigate to File -> New -> Project. On the left pane select Visual C# -> .NET Core and select ASP.NET Core Web Application, input the name of the project and click OK.
On the next screen select Web Application (Model-View-Controller) and press OK.
Since I do not want Bootstrap or jQuery, I am going to strip them out of the app and also remove the auto-generated template.
Within Solution Explorer navigate to Views -> Shared -> _Layout.cshtml and after stripping everything we do not need, we end up with the following
<!DOCTYPE html>
<html>
<head>
    <meta charset="utf-8" />
    <meta name="viewport" content="width=device-width, initial-scale=1.0" />
    <title>@ViewData["Title"] - netcore_vuejs</title>

    <environment include="Development">
        <link rel="stylesheet" href="~/css/site.css" />
    </environment>
    <environment exclude="Development">
        <link rel="stylesheet" href="~/css/site.min.css" asp-append-version="true" />
    </environment>
</head>
<body>
    @RenderBody()

    <environment include="Development">
        <script src="~/js/site.js" asp-append-version="true"></script>
    </environment>
    <environment exclude="Development">
        <script src="~/js/site.js" asp-append-version="true"></script>
    </environment>

    @RenderSection("Scripts", required: false)
</body>
</html>
We will be adding Vue.js via CDN. Still in _Layout.cshtml, within the Development and Production scripts add the following
<script src="https://cdn.jsdelivr.net/npm/vue@3.0.7/dist/vue.global.min.js"></script>
You should end up with this
<environment include="Development">
    <script src="https://cdn.jsdelivr.net/npm/vue@3.0.7/dist/vue.global.min.js"></script>
    <script src="~/js/site.js" asp-append-version="true"></script>
</environment>
<environment exclude="Development">
    <script src="https://cdn.jsdelivr.net/npm/vue@3.0.7/dist/vue.global.min.js"></script>
    <script src="~/js/site.js" asp-append-version="true"></script>
</environment>
It is time to do a final clean up. Delete About.cshtml and Contact.cshtml from Views -> Home. Open HomeController.cs and delete the About and Contact actions. You should end up with this
namespace netcore_vuejs.Controllers
{
    public class HomeController : Controller
    {
        public IActionResult Index()
        {
            return View();
        }

        public IActionResult Error()
        {
            return View(new ErrorViewModel { RequestId = Activity.Current?.Id ?? HttpContext.TraceIdentifier });
        }
    }
}
Open Index.cshtml and replace everything with the following
<h1>Getting Started with Vue.js in .NET Core</h1>
At this point, if you run the application (Ctrl + F5) you will only see the heading we just added to Index.cshtml. Pop open the browser console and you will see the following message
You are running Vue in development mode.
Make sure to turn on production mode when deploying for production.
See more tips at https://vuejs.org/guide/deployment.html
Hooray!! We are running Vue.js. I highly recommend using Chrome with Vue.js devtools. It will make your life so much easier when working with Vue.js. I will talk more about this when we start working with Vue.
That was a lot of set-up, but bear with me. We still need to set up Webpack to be able to compile our Sass files and do all of the JavaScript transpilation stuff.
Setting up Some Tooling
Note: This is a one-time setup across projects
First, make sure you have Node installed, you can get it from the official website.
Then, go back to your project and select Tools -> Options, on the left pane Projects and Solutions -> Web Package Management and add the path to Node installation at the top of the list, C:\Program Files\nodejs or C:\Program Files (x86)\nodejs

You will also need to download NPM Task Runner Visual Studio extension and install it — but you will need to close Visual Studio first.
Setting up Webpack
Note: If you’re not planning on writing modern JavaScript or Sass in your projects, you can skip this section entirely for your own projects; however, you’ll need it for this tutorial.
Open Command Prompt and navigate to .\netcore-vuejs\netcore-vuejs (if you named your project differently, go ahead and access that directory) and type the following
npm init -y

npm i @babel/core @babel/preset-env babel-loader cross-env css-loader cssnano file-loader mini-css-extract-plugin node-sass postcss-loader postcss-preset-env sass-loader webpack webpack-cli --save-dev
The first command will create the package.json, and the second will install the needed dependencies.
- @babel/core, @babel/preset-env, babel-loader — Transpile ES6+ JavaScript to ES5
- css-loader, cssnano, node-sass, sass-loader, postcss-loader, postcss-preset-env — Handle Sass, compile to CSS, minification and auto-prefixing
- mini-css-extract-plugin — Extract the compiled CSS to its own file
- file-loader — Handles files in CSS (i.e. background-image: url(./images/image.jpg))
- webpack, webpack-cli — Modern module bundler
- cross-env — Allows Windows users to assign environment variables in command line (used in
package.jsonfile)
Open package.json and add the following scripts:
"scripts": {
  "watch": "webpack --watch",
  "build": "cross-env NODE_ENV=production webpack"
},
- watch — Will watch JavaScript and Sass files for any changes and compile them. Will run during development
- build — Compiles minified production ready JavaScript and CSS files.
Back to your Visual Studio project right click on the root of the solution, select Add -> New item, then on the left pane ASP.NET Core -> Web -> Scripts and select JavaScript file, name it webpack.config.js.
Open webpack.config.js and copy the following. (Code will be more legible when you copy/paste to your code editor)
const path = require("path");
const MiniCssExtractPlugin = require("mini-css-extract-plugin");
const postcssPresetEnv = require("postcss-preset-env");

// We are getting 'process.env.NODE_ENV' from the NPM scripts
// Remember the 'dev' script?
const devMode = process.env.NODE_ENV !== "production";

module.exports = {
    // Tells Webpack which built-in optimizations to use
    // If you leave this out, Webpack will default to 'production'
    mode: devMode ? "development" : "production",

    // Webpack needs to know where to start the bundling process,
    // so we define the Sass file under './Styles' directory
    // and the script file under './Scripts' directory
    entry: {
        css: "./Styles/site.scss",
        site: "./Scripts/site.js",
    },

    // This is where we define the path where Webpack will place
    // a bundled JS file.
    output: {
        path: path.resolve(__dirname, "wwwroot"),

        // Specify the base path for all the styles within your
        // application. This is relative to the output path, so in
        // our case it will be ./wwwroot/css
        publicPath: "/css",

        // The name of the output bundle. Path is also relative
        // to the output path, so './wwwroot/js'
        filename: "js/[name].js",
    },
    devtool: devMode ? "inline-source-map" : "source-map",
    module: {
        // Array of rules that tells Webpack how the modules (output)
        // will be created
        rules: [
            {
                // Look for JavaScript files and process them according to the
                // rules specified in the different loaders
                test: /\.(js)$/,

                // Ignore the node_modules directory
                exclude: /node_modules/,

                // Use Babel to transpile ES6+ to ES5
                use: {
                    loader: "babel-loader",
                    options: {
                        presets: ["@babel/preset-env"],
                    },
                },
            },
            {
                // Look for Sass files and process them according to the
                // rules specified in the different loaders
                test: /\.(sa|sc)ss$/,

                // Use the following loaders from right-to-left, so it will
                // use sass-loader first and ending with MiniCssExtractPlugin
                use: [
                    {
                        // Extracts the CSS into a separate file and uses the
                        // defined configurations in the 'plugins' section
                        loader: MiniCssExtractPlugin.loader,
                    },
                    {
                        // Interprets CSS
                        loader: "css-loader",
                        options: {
                            importLoaders: 2,
                        },
                    },
                    {
                        // Use PostCSS to minify and autoprefix with vendor rules
                        // for older browser compatibility
                        loader: "postcss-loader",
                        options: {
                            // We instruct PostCSS to autoprefix and minimize our
                            // CSS when in production mode, otherwise don't do
                            // anything.
                            postcssOptions: {
                                plugins: devMode
                                    ? () => []
                                    : () => [
                                        postcssPresetEnv({
                                            // Compile our CSS code to support browsers
                                            // that are used in more than 1% of the
                                            // global market browser share. You can modify
                                            // the target browsers according to your needs
                                            // by using supported queries.
                                            // https://github.com/browserslist/browserslist#queries
                                            browsers: [">1%"],
                                        }),
                                        require("cssnano")(),
                                    ],
                            },
                        },
                    },
                    {
                        // Adds support for Sass files, if using Less, then
                        // use the less-loader
                        loader: "sass-loader",
                    },
                ],
            },
            {
                // Adds support to load images in your CSS rules. It looks for
                // .png, .jpg, .jpeg and .gif
                test: /\.(png|jpe?g|gif)$/,
                use: [
                    {
                        loader: "file-loader",
                        options: {
                            // The image will be named with the original name and
                            // extension
                            name: "[name].[ext]",

                            // Indicates where the images are stored and will use
                            // this path when generating the CSS files.
                            // Example, in site.scss I could have
                            // url('../wwwroot/images/pattern.png') and when generating
                            // the CSS file, file-loader will output as
                            // url(../images/pattern.png), which is relative
                            // to '/css/site.css'
                            publicPath: "../images",

                            // When this option is 'true', the loader will emit the
                            // image to output.path. In our case we don't want this
                            emitFile: false,
                        },
                    },
                ],
            },
        ],
    },
    plugins: [
        // Configuration options for MiniCssExtractPlugin. Here I'm only
        // indicating what the CSS output file name should be and
        // the location
        new MiniCssExtractPlugin({
            filename: devMode ? "css/site.css" : "css/site.min.css",
        }),
    ],
};
With our Webpack configuration completed, we need to create some bindings in Task Runner Explorer. Navigate to View -> Other Windows -> Task Runner Explorer. It will show at the bottom and you will see the scripts you created in package.json listed there.
We only need two bindings (under Custom)
- Right click build -> Bindings -> Before Build — This will run the task before each build
- Right click watch -> Bindings -> Project Open — This will run the task when you open the project
Task Runner Explorer should look like this

Getting our JavaScript and Sass files ready
Add two folders to the root of your solution: Scripts and Styles.
Add a JavaScript file to the Scripts folder you just created and name it site.js.
Add a two Sass files to the Styles folder you just created and name them site.scss and reset.scss consecutively (Right click Styles directory -> Add -> New item -> ASP.NET Core -> Web -> Content -> SCSS Style Sheet).
Open reset.scss and replace the contents with the following
html {
    height: 100%;
    box-sizing: border-box;
    font-size: 100%;
}
*,
*:before,
*:after {
    box-sizing: inherit;
}
body {
    margin: 0;
    padding: 0;
    overflow-x: hidden;
    background-color: #ededed;
    font-family: -apple-system, BlinkMacSystemFont, 'Segoe UI', Helvetica, Arial, sans-serif, 'Apple Color Emoji', 'Segoe UI Emoji', 'Segoe UI Symbol';
}
Now open site.scss and replace the contents with the following
@import "reset.scss";
Now that we have our JavaScript and Sass assets, go back to Task Runner Explorer then Right Click watch -> Run. This will activate this task and every time we save either our Sass or JavaScript files, they will recompile.
We finally finished setting up. Now the fun part begins.
[signupform][/signupform]
Frontend
Let us start by creating the form.
Open _Layout.cshtml and wrap @RenderBody() as follows
<div id="container">
    <main>
        @RenderBody()
    </main>
</div>
This will serve as our base template.
Open Index.cshtml and copy the following markup
<h1>Getting Started with Vue.js in .NET Core</h1>

<div id="form">
    <p>
        <label>Full Name</label>
        <input type="text" placeholder="Enter your full name" v-model="FullName" />
    </p>

    <p>
        <label>Email</label>
        <input type="text" placeholder="Enter your email" v-model="Email" />
    </p>

    <p>
        <label>Comments</label>
        <textarea rows="10" placeholder="Enter some positive comments" v-model="Comments"></textarea>
    </p>

    <div id="form-buttons">
        <button type="button" class="danger">Reset Form</button>
        <button type="button" class="success" ref="SubmitButton">Submit Form</button>
    </div>
</div>
One thing to notice here is the v-model attribute, although not a valid HTML attribute, it is a valid Vue attribute and is used to create a two-way binding on a form element or component (think of it as your state). The v-model attribute is limited to <input>, <select>, <textarea> and components (v-model). On the Vue side, you will have a property on a data object that must have the same name as the v-model. It will make more sense once we implement the Vue code.
We also see a ref attribute with the value SubmitButton. This is used to register a reference to an element or a child attribute (ref). We will be referencing this element in our Vue app later and it will make more sense.
Also, the form is enclosed in a div with an id of form which we will use to “initialize” our Vue app. Basically we are providing the Vue instance an existing DOM element to mount on.
Open site.scss and add the following
$success: rgb(35,209,96);
$danger: rgb(255,56,96);

input,
textarea {
    width: 100%;
    border: 1px solid #818181;
    border-radius: 2px;
    padding: 5px;
    font-size: .8em;
    &:focus {
        border-color: #58bee5;
    }
}
button {
    border: 1px solid #818181;
    border-radius: 3px;
    background-color: #818181;
    padding: 8px;
    color: #fff;
    font-weight: 700;
    &:disabled {
        border-color: #999999;
        background-color: #cccccc;
        color: #666666;
    }
}
.success {
    background-color: $success;
    border-color: darken($success, 10%);
}
.danger {
    background-color: $danger;
    border-color: darken($danger, 20%);
}
#container {
    display: grid;
    grid-template-columns: minmax(320px, 900px);
    justify-content: center;
    margin-top: 20px;
    font-size: 1.2em;
    main {
        background-color: #fff;
        border-radius: 5px;
        padding: 10px;
    }
    h1 {
        text-align: center;
    }
    #form-buttons {
        display: grid;
        grid-template-columns: auto auto;
        justify-content: space-between;
    }
    .invalid-input {
        color: $danger;
        font-size: .7em;
        font-weight: 600;
    }
}
If you run the app now (Ctrl + F5) you will see the form, which should look like this:

JavaScript
We will now start working on the JavaScript portion of the app. Open site.js and copy the following
const Form = {
    data() {
        return {
            FullName: '',
            Email: '',
            Comments: '',
            InvalidEmail: false,
        };
    },
};

Vue.createApp(Form).mount('#form');
At the very basic, a Vue app will contain a reference to an existing DOM element. In our case, we have the #form element reference where we mount the Vue app and our state, which is represented by the data function that returns an object with our initial state. (data)
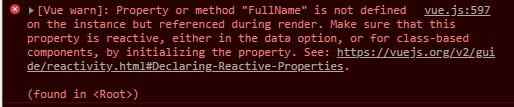
We have FullName, Email and Comments as properties to the data object, and we are also initializing them to an empty string. These must be the same as the ones we used for the v-model in our HTML. If you were to misspell the property name or add a v-model but not add it to the data object, then Vue will complain stating that the property or method is not defined.
If you still have the app running and have installed Vue.js devtools, go to your browser and press F-12 to open the Chrome developer tools, then select Vue and you will see a <Root> component, select it and at the bottom you will see the data object with the three properties that we have created. Start typing in your form fields and see those properties get updated.

Since we don’t want to submit the form until the user has filled out all of the fields, we want to disable the Submit button and only re-enable the button after they fill out the form. Open Index.cshtml and modify the Submit button HTML to look like this
<button type="button" class="success" ref="SubmitButton" v-bind:disabled="isSubmitDisabled">Submit Form</button>
To disable the button, we introduce v-bind and computed properties. v-bind dynamically binds one or more attributes to an expression. (v-bind) So, basically you are binding the disabled HTML attribute to Vue and assigning isSubmitDisabled computed property.
That being said, open site.js and add the following to the Vue object
const Form = {
    ...,
    computed: {
        isSubmitDisabled() {
            let isDisabled = true;

            if (
                this.FullName !== '' &&
                this.Email !== '' &&
                this.Comments !== ''
            ) {
                isDisabled = false;
            }

            return isDisabled;
        }
    }
};
Now we see the computed object. These properties get updated or re-computed when a reactive dependency changes (computed). In our case, it returns true and changes to false when FullName, Email and Comments are not blank.
So, on the HTML side of things, when isSubmitDisabled returns true, Vue will render disabled=”disabled” and when it returns false Vue will remove the disabled attribute.
The app should already be running, so switch to your browser, refresh the page (F5) and see it in action.
Let us work on the Reset Form button now. Switch back to Index.cshtml and modify the Reset Formbutton HTML to look like this
<button type="button" class="danger" v-on:click="ResetForm">Reset Form</button>
We are now introducing v-on, which is the Vue way of adding an event listener (v-on). Our event listener will be bound to the ResetForm method.
Open site.js and add the following
const Form = {
    ...,
    methods: {
        ResetForm() {
            this.FullName = '';
            this.Email = '';
            this.Comments = '';
        }
    }
};
methods is where you put your custom methods and are accessible within the Vue instance (methods).
Here we have the ResetForm method, so we just set the form fields to an empty string.
Go back to your browser, refresh it (F5), fill out the form, then press the Reset Form button and you will see the fields going back to their initial state.
Let’s create another event listener for the submit form. Modify the Submit Form button and the Vue app as follows
<button type="button" class="success" ref="SubmitButton" v-bind:disabled="isSubmitDisabled" v-on:click="SubmitForm">Submit Form</button>
const Form = {
    ...,
    methods: {
        ...,
        SubmitForm() {

        }
    }
};
Before we do the actual form submission, we want to check that the email the user enters is a valid email. For this, create a new JavaScript file under the Scripts directory and call it utils.js. Copy the following
export const validateEmail = email => {
    const re = /^(([^<>()\[\]\\.,;:\s@"]+(\.[^<>()\[\]\\.,;:\s@"]+)*)|(".+"))@((\[[0-9]{1,3}\.[0-9]{1,3}\.[0-9]{1,3}\.[0-9]{1,3}\])|(([a-zA-Z\-0-9]+\.)+[a-zA-Z]{2,}))$/;
    return re.test(String(email).toLowerCase());
};
You can use this file to put common methods to be shared among different JavaScript files. For this app I could have just added it to the methods section of our Vue app, but for the purpose of demonstrating ES Modules, this approach was better.
Switch back to site.js and add the following
import { validateEmail } from './utils';

const Form = {
    ...,
    data() {
        ...,
        return {
            InvalidEmail: false
        }
    },
    ...,
    methods: {
        ...,
        SubmitForm() {
            let submit = true;

            if (!validateEmail(this.Email)) {
                this.InvalidEmail = true;
                submit = false;
            } else {
                this.InvalidEmail = false;
            }

            if (submit) {
                // code to submit the form
            }
        }
    }
};
At the top we import the method we created (validateEmail) to validate the email address entered by the user. Then we introduce a new piece of state, InvalidEmail. This is going to be used to either show or hide a message when the entered email is invalid. Finally, we add some code to the SubmitForm method that checks for the email validity. If it is valid, go ahead and execute the code to submit the form.
Go back to Index.cshtml and add the following highlighted line, right below the email input.
<p>
    <label>Email</label>
    <input type="text" placeholder="Enter your email" v-model="Email" />
    <span class="invalid-input" v-show="InvalidEmail">Invalid Email</span>
</p>
With this, we introduce v-show directive. This option is used to conditionally display an element (v-show). Notice we are assigning InvalidEmail property, the same property name we created earlier on the Vue side of the app.
Switch back to your browser and refresh (F5) the page, fill out the form, but enter an invalid email address. When you press the Submit Form button, the Invalid Email message will appear. Now correct the email and press the button again, and the message will disappear.
Note: If you wanted to check for the email validity after the user finishes typing the email, and moves away from the email input, you can add the on blur event listener to the email input. Something like this v-on:blur=”CheckEmail”, then add CheckEmail method to the Vue side and check for the email validity.
I think we are ready to move to the backend. But before we do that, below is the full Vue code so far.
import { validateEmail } from './utils';

const Form = {
    data() {
      return {
        FullName: '',
        Email: '',
        Comments: '',
        InvalidEmail: false
      }
    },
    computed: {
        isSubmitDisabled() {
            let isDisabled = true;

            if (
                this.FullName !== '' &&
                this.Email !== '' &&
                this.Comments !== ''
            ) {
                isDisabled = false;
            }

            return isDisabled;
        }
    },
    methods: {
        ResetForm() {
            this.FullName = '';
            this.Email = '';
            this.Comments = '';
        },
        SubmitForm() {
            let submit = true;

            if (!validateEmail(this.Email)) {
                this.InvalidEmail = true;
                submit = false;
            } else {
                this.InvalidEmail = false;
            }

            if (submit) {
                // code to submit the form
            }
        }
    }
};
Backend
Create a new class under the Models directory and call it FormViewModel and add the following
public class FormViewModel
{
    public FormFields Fields { get; set; }
}

public class FormFields
{
    public string FullName { get; set; }
    public string Email { get; set; }
    public string Comments { get; set; }
}
As you can see FormFields class represents the fields in our form. These have to be named the sameas the data (state) properties in our Vue app in order for C# to bind them when we submit the form. We will use FormViewModel class as the parameter for our action result in the controller.
Open HomeController.cs and add the following Action
public IActionResult SubmitedForm([FromBody] FormViewModel form)
{
    string message = "";

    // Insert to database, send email, etc

    return Json(new { message });
}
If you notice, we have [FromBody] attribute on the parameter. .NET Core utilizes this to read the content-type header of the request and decide which of the configured IInputFormatters to use for model binding, since we will be sending the form contents as a JSON POST.
Once you get the form contents, you can do whatever it is that you need to do, like save to database, send emails to the users, etc. Then we have the return statement, which returns some JSON to the client. Here you can indicate whether the form submission was successful, or not.
Believe it or not, that is it for the C# side of things. Now, in order to submit the form, we are going to make use of Axios.
Open _Layout.cshtml and add the following two script tags above the Development environment section
<script src="https://cdn.jsdelivr.net/npm/promise-polyfill@7/dist/polyfill.min.js"></script>
<script src="https://unpkg.com/axios/dist/axios.min.js"></script>
<environment include="Development">
    ...
The first script tag is a polyfill for promises since Axios is a promise based library. Only include it if you are supporting Internet Explorer. If not, then you can leave it out (promise). The second script is Axios.
If you are not sure what a Polyfill does, or what it is, you can read more about it here.
We are almost done. Open site.js and add the following highlighted code to the SubmitForm method
const Form = {
    ...,
    methods: {
        ...,
        SubmitForm() {
            let submit = true;

            if (!validateEmail(this.Email)) {
                this.InvalidEmail = true;
                submit = false;
            } else {
                this.InvalidEmail = false;
            }

            if (submit) {
                axios({
                    method: 'post',
                    url: '/Home/SubmitedForm',
                    data: { "Fields": this.$data }
                }).then(res => {
                    alert('Successfully submitted feedback form ');
                    this.$refs.SubmitButton.setAttribute("disabled", "disabled");
                }).catch(err => {
                    alert(`There was an error submitting your form. See details: ${err}`);
                });
        	}
        }
    }
};
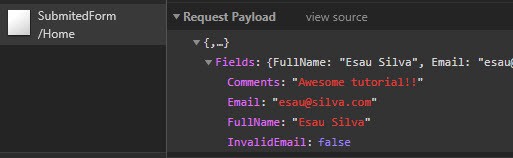
We use this.$data to send the entire data object. I do this because I don’t want to type each field individually. Notice we are sending the data object within a Fields property. If you recall, that is the same property name we have in our FormViewModel class.
After a successful form submission, we display an alert to the user with a successful message and disable the Submit Form button by referencing it with this.$refs.SubmitButton. Recall we added a ref attribute to the button and assigned SubmitButton to it.
That should be it. Run the application and after you submit the form, inspect the Request Payload and you will see that the InvalidEmail attribute will be present. However, C# will only bind the form fields.

See our final project in action.

You can get the full code on the GitHub repository.
Conclusion
We just scratched the surface with this tutorial, there is so much more to learn about Vue.js, like templates and components. I encourage you to read the docs and continue learning Vue.js.
Thank you for reading, and if you have any questions, comments or corrections, let me know in the comments section!
I originally posted this article on Bits and Pieces
[bottomads][/bottomads]
I loved the article. It was hard to get such clarity from many other websites. Thanks so much for making it so easy to understand.