This is a very common question among newer React developers, and one question I had when I was starting out with React and Node. In this short example I will show you how to make create-react-app work with a Node Express Backend.
[topads][/topads]
create-react-app
Create a project using create-react-app
create-react-app example-create-react-app-express
Create a /client directory under example-create-react-app-express directory and move all of the React boilerplate created by create-react-app to this new directory.
cd example-create-react-app-express
mkdir client
The Node Express Server
Create a package.json inside the root directory (example-create-react-app-express) and copy the following contents.
{
  "name": "example-create-react-app-express",
  "version": "1.0.0",
  "scripts": {
    "client": "cd client && yarn start",
    "server": "nodemon server.js",
    "dev": "concurrently --kill-others-on-fail \"yarn server\" \"yarn client\""
  },
  "dependencies": {
    "body-parser": "^1.18.3",
    "express": "^4.16.4"
  },
  "devDependencies": {
    "concurrently": "^4.0.1"
  }
}
Notice I am using concurrently to run the React app and Server at the same time. The –kill-others-on-fail flag will kill other processes if one exits with non zero status code.
Install nodemon globally and the server dependencies.
npm i nodemon -g
yarn
Create a server.js file and copy the following contents
const express = require("express");
const bodyParser = require("body-parser");

const app = express();
const port = process.env.PORT || 5000;

app.use(bodyParser.json());
app.use(bodyParser.urlencoded({ extended: true }));

app.get("/api/hello", (req, res) => {
  res.send({ express: "Hello From Express" });
});

app.post("/api/world", (req, res) => {
  console.log(req.body);
  res.send(
    `I received your POST request. This is what you sent me: ${req.body.post}`
  );
});

app.listen(port, () => console.log(`Listening on port ${port}`));
This is a simple Express server that will run on port 5000 and have two API routes: GET – /api/hello, and POST –/api/world.
At this point you can run the Express server with the following command (still inside the root directory):
node server.js
Now navigate to http://localhost:5000/api/hello, and you will get the following:
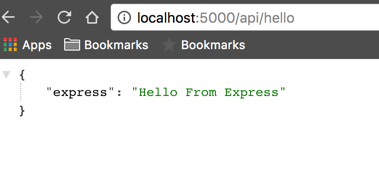
We will test the POST route once we build the React app.
[signupform][/signupform]
The React App
Now switch over to the client directory where our React app lives.
Add the following line to package.json file created by create-react-app.
"proxy": "http://localhost:5000/"
The key to use an Express backend with a project created with create-react-app is to use a proxy. This tells Webpack development server to proxy our API requests to our API server, given that our Express server is running on localhost:5000.
Now modify /client/src/App.js to call our Express API Backend, changes are highlighted.
import React, { Component } from 'react';

import logo from './logo.svg';

import './App.css';

class App extends Component {
  state = {
    response: '',
    post: '',
    responseToPost: '',
  };

  componentDidMount() {
    this.callApi()
      .then(res => this.setState({ response: res.express }))
      .catch(err => console.log(err));
  }

  callApi = async () => {
    const response = await fetch('/api/hello');
    const body = await response.json();

    if (response.status !== 200) throw Error(body.message);

    return body;
  };

  handleSubmit = async e => {
    e.preventDefault();
    const response = await fetch('/api/world', {
      method: 'POST',
      headers: {
        'Content-Type': 'application/json',
      },
      body: JSON.stringify({ post: this.state.post }),
    });
    const body = await response.text();

    this.setState({ responseToPost: body });
  };

  render() {
    return (
      <div className="App">
        <header className="App-header">
          <img src={logo} className="App-logo" alt="logo" />
          <p>
            Edit <code>src/App.js</code> and save to reload.
          </p>
          <a
            className="App-link"
            href="https://reactjs.org"
            target="_blank"
            rel="noopener noreferrer"
          >
            Learn React
          </a>
        </header>
        <p>{this.state.response}</p>
        <form onSubmit={this.handleSubmit}>
          <p>
            <strong>Post to Server:</strong>
          </p>
          <input
            type="text"
            value={this.state.post}
            onChange={e => this.setState({ post: e.target.value })}
          />
          <button type="submit">Submit</button>
        </form>
        <p>{this.state.responseToPost}</p>
      </div>
    );
  }
}

export default App;
We create callApi method to interact with our Express API Back-end, then we call this method in componentDidMount and finally set the state to the API response, which will be Hello From Express.
Notice we didn’t use a fully qualified URL http://localhost:5000/api/hello to call our API, even though our React app runs on a different port (3000). This is because of the proxy line we added to the package.json file earlier.
We have a form with a single input. When submitted calls handleSubmit, which in turn calls our POST Express API route then saves the response to state and displays a message to the user: I received your POST request. This is what you sent me: [message from input].
No open ./client/src/App.css and modify .App-header class as follows (highlighted changes)
.App-header {
...
min-height: 50%;
...
padding-bottom: 10px;
}
[signupform][/signupform]
Running the App
If you still have the server running, go ahead and stop it by pressing Ctrl+C in your terminal.
From the project root directory run the following:
yarn dev
This will launch the React app and run the server at the same time.
Now navigate to http://localhost:3000 and you will hit the React app displaying the message coming from our Express back-end server. Nice!!!

Now, type something in the input field and submit the form, you will see the response from the POST Express route displayed right below the input field.

Finally take a look at at your terminal, you will see the message we sent from the client, that is because we call console.log on the request body in the POST Express route.

Production Deployment to Heroku
Open server.js and replace with the following contents:
const express = require("express");
const path = require("path");
const bodyParser = require("body-parser");

const app = express();
const port = process.env.PORT || 5000;

app.use(bodyParser.json());
app.use(bodyParser.urlencoded({ extended: true }));

// API calls
app.get("/api/hello", (req, res) => {
  res.send({ express: "Hello From Express" });
});

app.post("/api/world", (req, res) => {
  console.log(req.body);
  res.send(
    `I received your POST request. This is what you sent me: ${req.body.post}`
  );
});

if (process.env.NODE_ENV === "production") {
  // Serve any static files
  app.use(express.static(path.join(__dirname, "client/build")));

  // Handle React routing, return all requests to React app
  app.get("*", function (req, res) {
    res.sendFile(path.join(__dirname, "client/build", "index.html"));
  });
}

app.listen(port, () => console.log(`Listening on port ${port}`));
Open ./package.json and add the following to the scripts entry
"start": "node server.js",
"heroku-postbuild": "cd client && npm install && npm install --only=dev --no-shrinkwrap && npm run build"
Heroku will run the start script by default and this will serve our app. Then we want to instruct Heroku to build our client app, we do so with heroku-postbuild script.
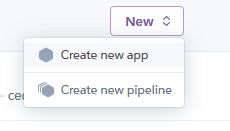
Now, head over to Heroku and log in (or open an account if you don’t have one).
Create a new app and give it a name
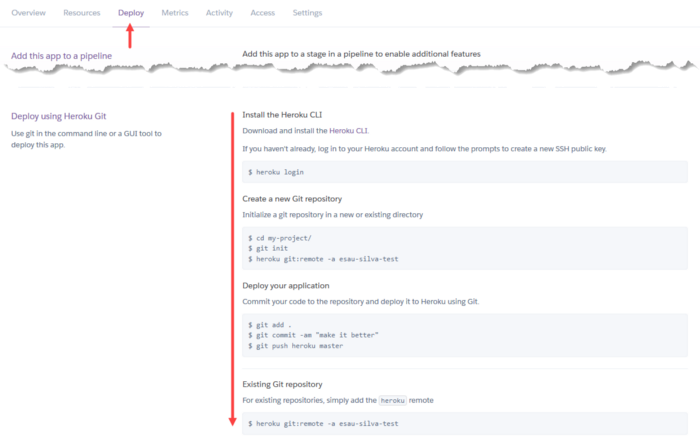
Click on the Deploy tab and follow the deploy instructions (which I think they are pretty self-explanatory, no point on replicating them here)
And that is it, you can open your app by clicking on the Open app button at the top right corner within the Heroku dashboard for your app.
Visit the deployed app for this tutorial: https://cra-express.herokuapp.com/
Project Structure
This will be the final project structure.

Get the full code on the GitHub repository.
Thank you for reading and I hope you enjoyed it. Any question, suggestions let me know in the comments below!
You can follow me on Twitter and GitHub.
[bottomads][/bottomads]
Hi, this is a great tutorial. Thanks for sharing.
I am recently developing an application like this one. I want to integrate with SSE to make web page update when api was called. Do you have any idea?
setState triggers a re-render, so when you make the API call you can update the app’s state with whatever response data you got from the call, and React will update the page. https://reactjs.org/docs/react-component.html#setstate
I am getting a proxy error” Proxy error: Could not proxy request /api/hello from localhost:3000 to http://localhost:5000/.” can you guide me on how to resolve it Thanks.
Did you add “proxy”: “http://localhost:5000/” to package.json on the client directory?
This is a great tutorial! Thank you for creating it.
I’m pretty new to Node and React and this helped me greatly.
How would you move this project now to production?
Thanks!
🙂 Nevermind I used Nginx for the production version. Thanks again for a great tutorial!
Awesome! Great it worked out for you
How such type of setup will work in Production? where we only have single port to listen?
Could you give me an idea if I want to deploy it to product?
Hi Denish, I added a section at the end of the post detailing production deployment.
I have read many guides about it and in truth this is the best, it is the only one that creates 2 package.json leaving it in a clear and organized way. Truly, thank you very much for the guide.
Thank you for the kind words!
Thanks for this post, I found it helpful, even though I don’t use heroku. There are a few things not immediately obvious to me despite your excellent description. The bit about what artifacts do you actually deploy, has been skipped over. Probably because three answer is obvious? All examples I have seen show npm install of backend dependencies such as express and the addition of scripts into packages as well, implying that packages must be an artifact that is deployed… along with node_modules, that contains half the internet of dependencies. Surely we don’t deploy all that stuff that webpack has gone to all the trouble of tree shaking out? Cra generates static client side bundles, why do we mix client and server stuff together, then deploy a bunch of stuff we never need?
Very useful. The tuto I search since many times. May God Help You to continue with greate post
hi ,
I followed this tutorial, it works perfect on localhost, now I want to deploy on Digital Ocean. Can you pls guide me. As I am new to web development.
Thanks
Hello, I haven’t deployed to Digital Ocean, so I wouldn’t know the best way to approach this
Hi ,
like i found out that production url needs to be set in the package. json of client and no idea what setting needs to be done for package.json for node.
Right now, it showing my fronted only.
Thanks
Swati
Are you referring to the proxy URL in client? If so then you do not need it since both, React and Node will be running on the same server (Heroku)
Hello I have created a website following your guide, but I don’t know how to add ssl to this setup. Another guide got me to install nginx but that is conflicting with what I have built here because port 80 is already in use. Any guidance appreciated.