Sass is a very popular CSS pre-processors and the intent of the tutorial is to show you how to compile Sass files within Visual Studio using Webpack, this will include minification and autoprefixing for production.
Sure, there are some plug-ins on the Visual Studio Marketplace, and is nice to just install a plug-in and forget about configuration. However, what will happen if the plug-in is not supported anymore and stops working with newer Visual Studio versions? Well, too bad. As in the case with one of the most popular compiler plug-ins in the market.
By configuring the compilation yourself, you will have total control on the output plus the vendor prefixes will be added automatically for your CSS rules. How cool is that?
[topads][/topads]
Prerequisites
You will need to have Node installed, you can grab it here. That’s it really, and NPM, but it will also be installed with Node.
Creating the Project
Note: We will be creating a .NET Core MVC app, but the same principles apply to any ASP.NET MVC app. You would just need to modify the Webpack configuration a little bit to output the CSS file to the Content directory.
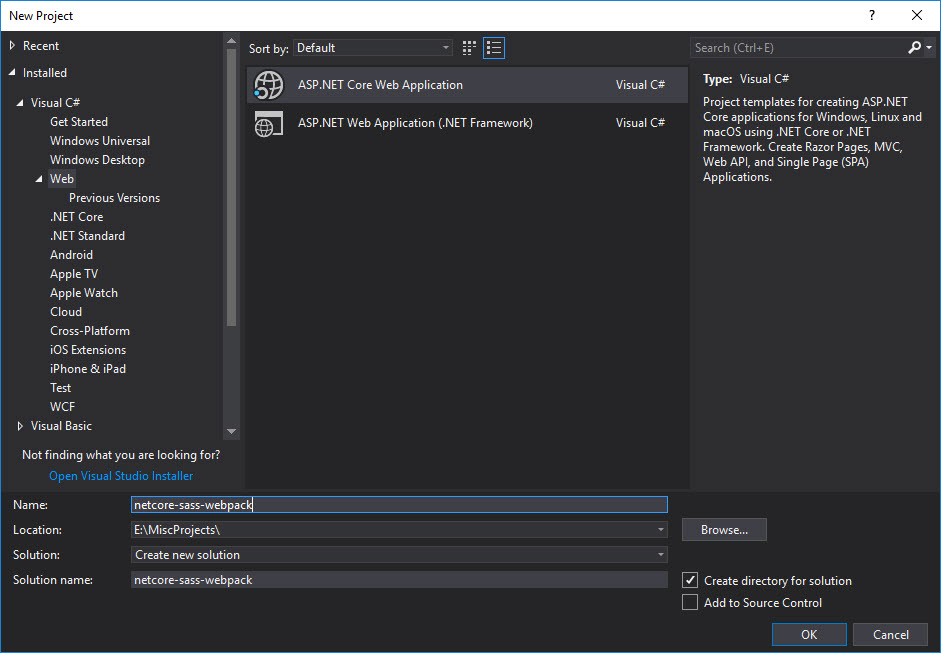
Open Visual Studio and create a new ASP.NET Core Web Application, then select Web Application (Model-View-Controller). I’m naming my project netcore-sass-webpack.
Create a Styles folder within the root of the project and inside it create a Sass file and name it site.scss. Open this new Sass file and copy the following
/* Please see documentation at https://docs.microsoft.com/aspnet/core/client-side/bundling-and-minification
for details on configuring this project to bundle and minify static web assets. */

body {
    background: #D69655 url('../wwwroot/images/pattern.png') repeat;
}

a.navbar-brand {
    white-space: normal;
    text-align: center;
    word-break: break-all;
}

/* Provide sufficient contrast against white background */
a {
    color: #0366d6;
}

.btn-primary {
    color: #fff;
    background-color: #1b6ec2;
    border-color: #1861ac;
}

.nav-pills .nav-link.active, .nav-pills .show > .nav-link {
    color: #fff;
    background-color: #1b6ec2;
    border-color: #1861ac;
}

/* Sticky footer styles
-------------------------------------------------- */
html {
    font-size: 14px;
}

@media (min-width: 768px) {
    html {
        font-size: 16px;
    }
}

.border-top {
    border-top: 1px solid #e5e5e5;
}

.border-bottom {
    border-bottom: 1px solid #e5e5e5;
}

.box-shadow {
    box-shadow: 0 .25rem .75rem rgba(0, 0, 0, .05);
}

button.accept-policy {
    font-size: 1rem;
    line-height: inherit;
}

/* Sticky footer styles
-------------------------------------------------- */
html {
    position: relative;
    min-height: 100%;
}

body {
    /* Margin bottom by footer height */
    margin-bottom: 60px;
}

.footer {
    position: absolute;
    bottom: 0;
    width: 100%;
    white-space: nowrap;
    line-height: 60px; /* Vertically center the text there */
}
You will notice this is the same CSS provided by Visual Studio when we created the project, with the exception of the background rule in the body tag. Now delete the provided CSS located under wwwroot/css, both files (site.css and site.min.css), don’t worry, we will auto-generate these with Webpack.
Now, download pattern.png and place it under wwwroot/images.
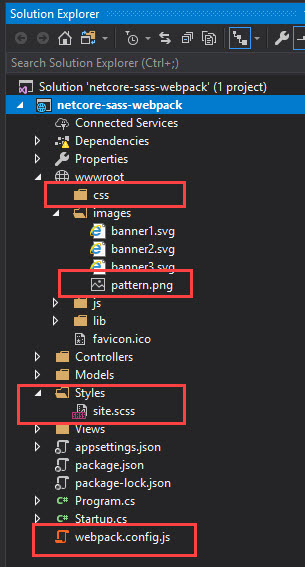
Create an empty JavaScript file under the root of the application and name it webpack.config.js, we will take care of this later. You should en up with the following project structure
Note: You don’t need to do the following two steps for every project, just once. Unless you un-install and re-install Visual Studio.
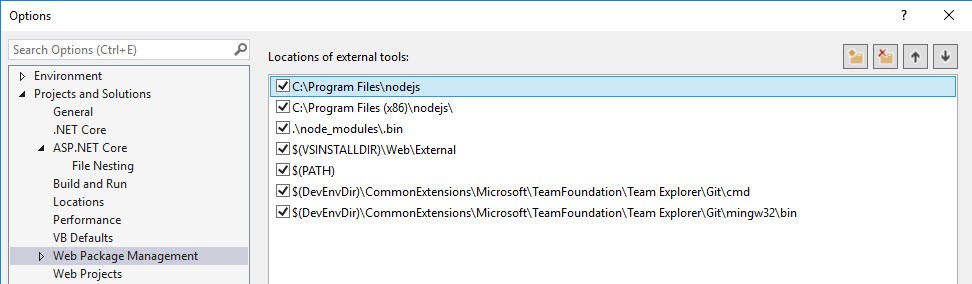
You will need to provide Visual Studio with the Node installation path. Go back to your project and select Tools -> Options, on the left pane Projects and Solutions -> Web Package Management and add the path to Node installation at the top of the list, C:\Program Files\nodejs or C:\Program Files (x86)\nodejs; depending if you installed the x64 or x86 version.
Finally download NPM Task Runner and install it, you will need to close Visual Studio first.
Webpack and NPM Dependencies
Open Command Prompt and navigate to the root of the project and install the needed dependencies
cd netcore-sass-webpack\netcore-sass-webpack
npm init -y
npm i -D webpack webpack-cli node-sass postcss-loader postcss-preset-env sass-loader css-loader cssnano mini-css-extract-plugin cross-env file-loader
The first npm command initializes your package.json and the second installs your dependencies.
- webpack, webpack-cli – Module bundler
- node-sass – Bindings for Node to LibSass; provides support for Sass
- postcss-loader, postcss-preset-env – PostCSS loader for Webpack to process autoprefixing and minification
- sass-loader, css-loader – Webpack needs specific loaders to support Sass and CSS
- cssnano – CSS minifier
- mini-css-extract-plugin – Extracts the CSS to a separate file
- cross-env – Provides support to Windows users for environment variables. We will use NODE_ENV environment variable
- file-loader – Provides support for files (images) in our CSS rules
At this point you can re-open the project in Visual Studio. After the project finishes loading, open package.json and add the following scripts
"scripts": {
  "dev": "webpack --watch",
  "build": "cross-env NODE_ENV=production webpack"
},
- dev – We will bind this script whenever the project opens and Webpack will continually watch for changes to the source Sass files, compile them and output the separate CSS file
- build – We will bind this script before each project build and will produce the production CSS file, including minification and autoprefixing
Note: The NPM scripts will run automatically using the Task Runner window, more on that later.
It is time to work on our Webpack configuration. Open webpack.config.js and copy the following
[signupform][/signupform]
const path = require("path");
const MiniCssExtractPlugin = require("mini-css-extract-plugin");
const postcssPresetEnv = require("postcss-preset-env");

// We are getting 'process.env.NODE_ENV' from the NPM scripts
// Remember the 'dev' script?
const devMode = process.env.NODE_ENV !== "production";

module.exports = {
    // Tells Webpack which built-in optimizations to use
    // If you leave this out, Webpack will default to 'production'
    mode: devMode ? "development" : "production",

    // Webpack needs to know where to start the bundling process,
    // so we define the Sass file under './Styles' directory
    entry: ["./Styles/site.scss"],

    // This is where we define the path where Webpack will place
    // a bundled JS file. Webpack needs to produce this file,
    // but for our purposes you can ignore it
    output: {
        path: path.resolve(__dirname, "wwwroot"),

        // Specify the base path for all the styles within your
        // application. This is relative to the output path, so in
        // our case it will be ./wwwroot/css
        publicPath: "/css",

        // The name of the output bundle. Path is also relative
        // to the output path, so './wwwroot/js'
        filename: "js/sass.js",
    },
    module: {
        // Array of rules that tells Webpack how the modules (output)
        // will be created
        rules: [
            {
                // Look for Sass files and process them according to the
                // rules specified in the different loaders
                test: /\.(sa|sc)ss$/,

                // Use the following loaders from right-to-left, so it will
                // use sass-loader first and ending with MiniCssExtractPlugin
                use: [
                    {
                        // Extracts the CSS into a separate file and uses the
                        // defined configurations in the 'plugins' section
                        loader: MiniCssExtractPlugin.loader,
                    },
                    {
                        // Interprets CSS
                        loader: "css-loader",
                        options: {
                            importLoaders: 2,
                        },
                    },
                    {
                        // Use PostCSS to minify and autoprefix with vendor rules
                        // for older browser compatibility
                        loader: "postcss-loader",
                        options: {
                            // We instruct PostCSS to autoprefix and minimize our
                            // CSS when in production mode, otherwise don't do
                            // anything.
                            postcssOptions: {
                                plugins: devMode
                                    ? () => []
                                    : () => [
                                        postcssPresetEnv({
                                            // Compile our CSS code to support browsers
                                            // that are used in more than 1% of the
                                            // global market browser share. You can modify
                                            // the target browsers according to your needs
                                            // by using supported queries.
                                            // https://github.com/browserslist/browserslist#queries
                                            browsers: [">1%"],
                                        }),
                                        require("cssnano")(),
                                    ],
                            },
                        },
                    },
                    {
                        // Adds support for Sass files, if using Less, then
                        // use the less-loader
                        loader: "sass-loader",
                    },
                ],
            },
            {
                // Adds support to load images in your CSS rules. It looks for
                // .png, .jpg, .jpeg and .gif
                test: /\.(png|jpe?g|gif)$/,
                use: [
                    {
                        loader: "file-loader",
                        options: {
                            // The image will be named with the original name and
                            // extension
                            name: "[name].[ext]",

                            // Indicates where the images are stored and will use
                            // this path when generating the CSS files.
                            // Example, in site.scss I have
                            // url('../wwwroot/images/pattern.png') and when generating
                            // the CSS file, file-loader will output as
                            // url(../images/pattern.png), which is relative
                            // to '/css/site.css'
                            publicPath: "../images",

                            // When this option is 'true', the loader will emit the
                            // image to output.path
                            emitFile: false,
                        },
                    },
                ],
            },
        ],
    },
    plugins: [
        // Configuration options for MiniCssExtractPlugin. Here I'm only
        // indicating what the CSS output file name should be and
        // the location
        new MiniCssExtractPlugin({
            filename: devMode ? "css/site.css" : "css/site.min.css",
        }),
    ],
};
Refer to the comments in the code to understand the configuration.
Now we need to create some bindings in Task Runner Explorer. Navigate to View -> Other Windows -> Task Runner Explorer, the window will show at the bottom and you will see the scripts you created in package.json listed there under Custom. You will also see some tasks under Defaults, you can just ignore them.
We need two bindings
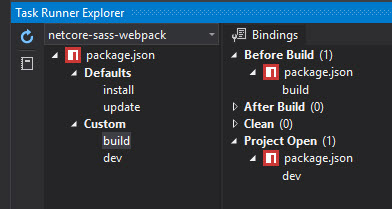
- Right click build -> Bindings -> Before Build – Visual Studio will run this task before each build. Remember this npm script runs Webpack for production and will optimize the CSS file
- Right click dev -> Bindings -> Project Open – Visual Studio will run this task when you open the project. Remember this npm script runs Webpack in watch mode and will watch for any changes in your Sass files and output the processed CSS file
Task Runner Explorer should look like this
Note: For some reason, Visual Studio sometimes will fail to start the dev task upon opening the project. If that happens, just open the Task Explorer and run the task manually.
You can get the full code from the GitHub repository.
Final Thoughts
And that’s all there is too it. Since you already have Visual Studio open, none of the tasks are running, go ahead and right click the dev task and select run. You will see the task loading and when it finishes you will see that a site.css file was created under wwwroot/css directory. Open site.scss, make a change and save it. Now open site.css, you will see your change reflected there, cool!!.
Run your project by pressing Ctrl + F5, you will see a site.min.css file created under wwwroot/css directory, this file was created when Task Runner ran the build script before it built the project.
The final site should look like this
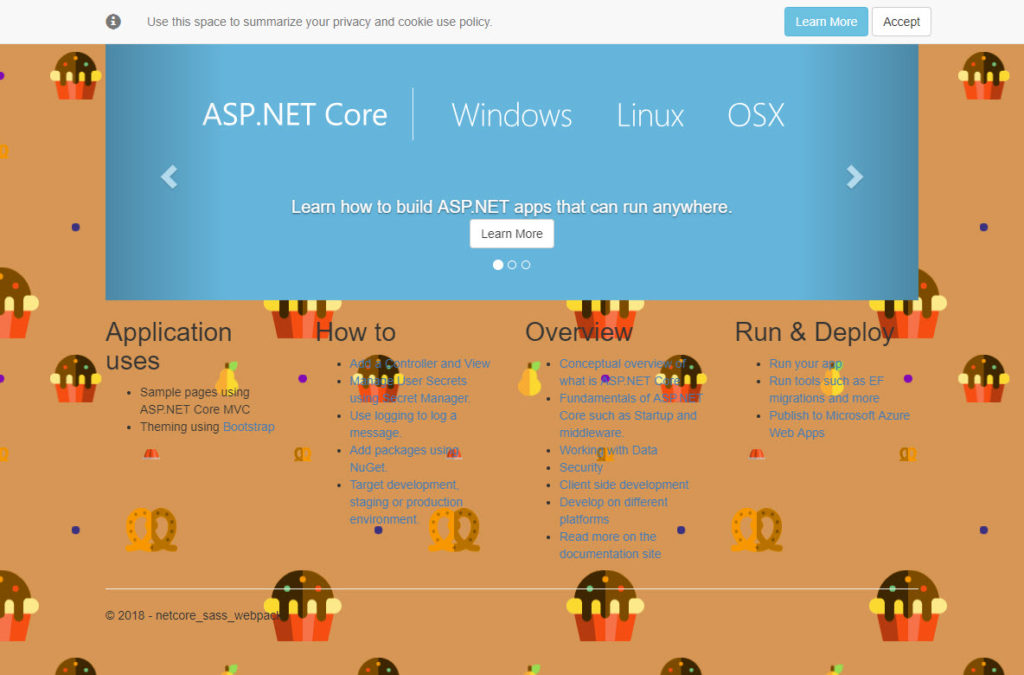
I know, I know, the background is very cheese, but I needed an image to show the Webpack file-loader in action.
With this configuration, you can even add support to transpile modern JavaScript (ES6+) to ES5. Look into these: @babel/core, babel-loader, @babel/preset-env.
Thank you for reading and I hope you enjoyed it. If you have any questions, suggestions or corrections let me know in the comments below. Don’t forget to give this article a share and you can follow me on Twitter, GitHub, Medium, LinkedIn.
[bottomads][/bottomads]
Nice tutorial! By the way, where is button R?
Haha, Button R is still lost