With many modal solutions on NPM, I ended up writing my own React Custom Modal Component to meet my specific needs.
Well, the above statement is not entirely true. I was looking for a “lightbox” type gallery that would allow me to display images (multiple images in the same modal), videos, text, and a mix of that, all within the same modal window, and to accomplish all of that I needed a custom modal component!
This is a two-part tutorial:
- Create a React Custom Modal (you are here)
- Create a React Custom Lightbox Gallery
[topads][/topads]
The CSS
I will be writing all the CSS with Styled Components, but it can be easily ported to plain CSS if you are not using CSS-in-JS or to some other CSS-in-JS library.
Note: CSS is written with a mobile-first approach in mind.
Shared styles: ~styles\Modal.js
import styled from 'styled-components';

/*
This is the background of the modal covering the entire screen and staying in a fixed position.
*/
export const Container = styled.div`
  position: fixed;
  top: 0;
  left: 0;
  width: 100%;
  height: 100%;
  background: rgba(0, 0, 0, 0.5);
  backdrop-filter: blur(4px);

  /* We will be passing isOpen variable to either show or hide the modal */
  display: ${({ isOpen }) => (isOpen ? 'block' : 'none')};

  /* We need to show the modal on top of all the other elements */
  z-index: 999;
`;

/*
This is the body where the modal contents will be displayed. The modal will cover the entire screen on mobile.
*/
export const Body = styled.section`
  width: 100%;
  height: 100%;
  position: fixed;
  background: #fff;
  top: 50%;
  left: 50%;
  transform: translate(-50%, -50%);
  box-shadow: 0 1rem 3rem hsla(0, 0%, 0%, 0.3);
  padding: 1rem;

  /* I want to show scrollbars when the content is taller than the screen */
  overflow: auto;

  /* At the medium breakpoint, the body width will change to 70% */
  @media (min-width: 824px) {
    width: 70%;
  }
`;

/*
Close modal button.
*/
export const Close = styled.button`
  border: 0;
  padding: 0;
  margin: 0;
  background: none;
  color: #954c4c;
  font-size: 5rem;
  cursor: pointer;
  position: absolute;
  right: 1rem;
  top: -1.5rem;
  @media (min-width: 824px) {
    font-size: 6rem;
    top: -2.5rem;
  }
  @media (min-width: 1186px) {
    font-size: 7rem;
    top: -3rem;
  }
`;

/*
Modal title/heading
*/
export const Title = styled.h4`
  font-size: 1.9rem;
  text-align: center;
  @media (min-width: 824px) {
    font-size: 2.2rem;
  }
  @media (min-width: 1186px) {
    font-size: 2.6rem;
  }
`;
This is what the styles look like:

Next, we are going to apply those styles to a modal component.
The Actual Custom Modal Component
The component will receive a prop object named modalState with the following properties:
value: This is a boolean property indicating whether the modal is opened or closed.toggle: This is a function that toggles thevalueproperty between true and false (open/close). The parent component will handle/store the state.
import React from 'react';
import PropTypes from 'prop-types';

// Importing the styles and renaming two of them
import {
  Container as ModalContainer,
  Body,
  Close as CloseModal,
} from '~styles/Modal';

const Modal = ({ children, modalState }) => {
  return (

    // This is where we pass the isOpen variable to the styled component
    // indicating whether to show or hide the modal
    <ModalContainer isOpen={modalState.value}>
        <Body>
          <CloseModal onClick={modalState.toggle}>×</CloseModal>
         {children}
        </Body>
    </ModalContainer>
  );
};

Modal.propTypes = {
  modalState: PropTypes.shape({
    value: PropTypes.bool.isRequired,
    toggle: PropTypes.func.isRequired,
  }).isRequired,
};

export { Modal };
Now, let’s add a keyboard shortcut to exit the modal by pressing the ESC key. For that, I am using a tiny library called tinykeys, to install:
npm install --save tinykeys
Update the component with the highlighted code below.
Some code was omitted for brevity.
import React, { useEffect }  from 'react';
import PropTypes from 'prop-types';
import tinykeys from 'tinykeys';

import {...} from '~styles/Modal';

const Modal = ({ children, modalState }) => {
  useEffect(() => {
    let unsubscribe = tinykeys(window, {
      Escape: () => modalState.toggle(), // we call the toggle function to close the modal
    });

    return () => {
      unsubscribe();
    };
  });

  return (...);
};

Modal.propTypes = {...};

export { Modal };
To learn more about tinykey’s API, head over to the documentation.
Next, we import the modal component to a parent container.
Parent Container (Component) to the Custom Modal
[signupform][/signupform]
import React, { useState } from 'react';

// Importing the modal we created in the previous section
import { Modal } from '~src/components/Gallery/Modal';

const Gallery = () => {
  // This is the state we pass to the modal controlling opened/closed state
  const [isModalOpen, setIsModalOpen] = useState(false);

  // This is the toggle function we pass to the modal component
  const toggleModal = () => setIsModalOpen(!isModalOpen);

  return (
    <>
      <p>
        Lorem ipsum dolor sit amet, consectetur adipisicing elit. Laudantium
        quia ratione eum eaque. Excepturi sapiente repellendus consequatur atque
        vel architecto iusto, magnam molestias animi reprehenderit praesentium
        porro nemo, assumenda qui?
      </p>
      <button onClick={toggleModal}>Open Modal</button>
      {isModalOpen && (
        <Modal
          // Passing the state and function as an object to the modal
          modalState={{ value: isModalOpen, toggle: toggleModal }}
        >
          MY MODAL BODY
        </Modal>
      )}
    </>
  );
};

export { Gallery };
And that is all there is to it really. You can see the modal in all its glory in the below GIF!

BONUS: Overriding the styles
What good would it be if I could not use the modal outside the gallery context. Lucky for us, it is pretty easy to re-use the modal component and override some styles to use it in a different context.
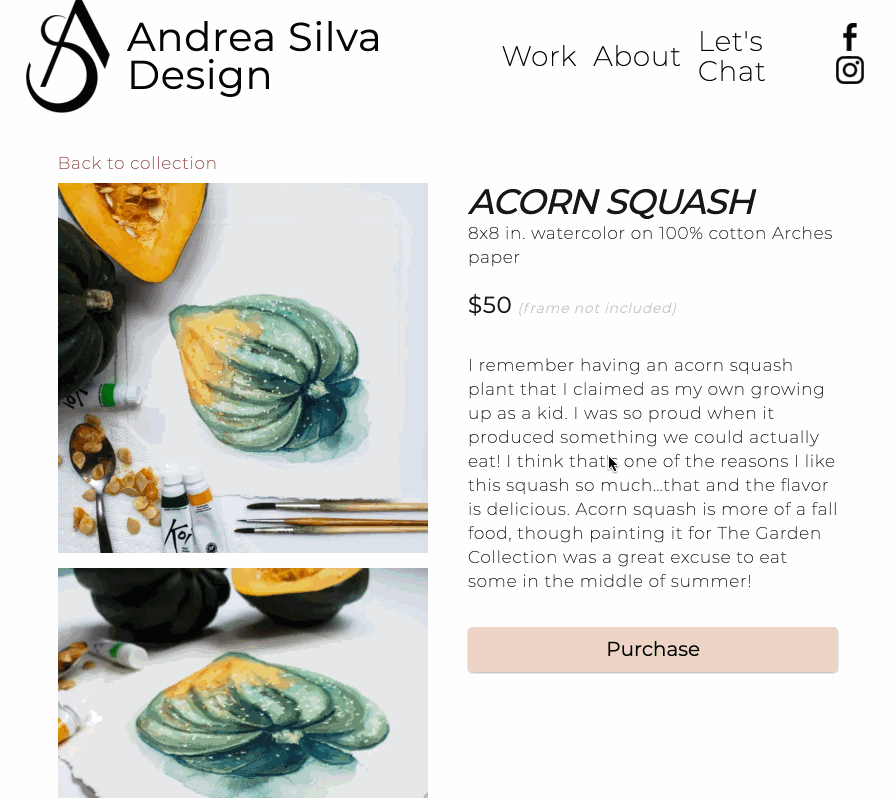
The modal default styles are coded to have a 100% height. What I want to do is use the modal to display a purchase form and have an auto height to adapt to my custom form (or whatever other elements I want to display in the modal).
Let’s start by adding a new styled component to ~styles/Modal.js
/*
With styled-components, I can inherit some "base" styles and override
them or add new ones. In this case we are inheriting the styles from the
Body styled component
*/
export const BodyResponsive = styled(Body)`
  padding-top: 3.4rem;

  /* We override the height property to auto when we reach the medium breakpoint */
  @media (min-width: 824px) {
    height: auto;
  }

  /* Then we decrease the width when we reach the large breakpoint */
  @media (min-width: 1186px) {
    width: 50%;
  }
`;
Then we create a new Modal Component with this new “responsive” body
import React, { useEffect } from 'react';
import PropTypes from 'prop-types';
import tinykeys from 'tinykeys';

import {
  Container as ModalContainer,
  BodyResponsive,
  Close as CloseModal,
} from '~styles/Modal';

const Modal = ({ children, modalState }) => {
  useEffect(() => {
    let unsubscribe = tinykeys(window, {
      Escape: () => toggleModal(),
    });

    return () => {
      unsubscribe();
    };
  });

  const toggleModal = () => {
    modalState.toggle();
  };

  return (
    <ModalContainer isOpen={modalState.value}>
      <BodyResponsive>
        <CloseModal onClick={toggleModal}>×</CloseModal>
        {children}
      </BodyResponsive>
    </ModalContainer>
  );
};

Modal.propTypes = {
  children: PropTypes.object.isRequired,
  modalState: PropTypes.shape({
    value: PropTypes.bool,
    toggle: PropTypes.func.isRequired,
  }).isRequired,
};

Modal.defaultProps = {
  modalState: {
    value: false,
  },
};

export { Modal };
And how it looks
Code Sandbox Demo
And of course, this is the Sandbox: https://codesandbox.io/s/react-custom-modal-u197j
In conclusion
In the next post in this series, I will cover creating the gallery you see in the GIFs, including Backward/Forward buttons to go the previous/next image in the galley from the modal and as a bonus, implementing swiping functionality (previous/next) for mobile devices. Stayed tuned!
Final Thoughts
This is a very crude implementation and there are many ways to further extract the components and create a better API for this modal. However, this is working for my use case and can serve as a base for you to improve upon it.
If you liked this short tutorial, share it on your social media and you can follow me on Twitter or LinkedIn.
Consider giving back by getting me a coffee (or a couple) by clicking the following button:
[bottomads][/bottomads]