Build a secure React app that provides takes advantage of Firebase simplicity to consume OAuth Authentication with GitHub, Twitter and Facebook.
For an app to be secure, we usually need to implement some kind of authentication, whether it is the basic username/password combo or a two-factor authentication. In this post we’ll learn how to leverage Firebase to make our app secure and give our users the choice to log in with their preferred social account.
[topads][/topads]
I know we all love code here, but before we jump into coding the app, first we need to create a project in Firebase, then setup new apps on GitHub, Twitter and Facebook.
Some Notes
I will be using Yarn throughout this tutorial, but you can use npm. Also, I will assume you have a basic knowledge of React and React Router.
We will also be using Create React App (CRA) to bootstrap the application.
Setting up the Initial Project
Create the project template by typing the following in your terminal:
create-react-app react-firebase-oauth
cd react-firebase-oauth
yarn
touch .env
The last command creates the file that will hold our environment variables.
Load the project in your favorite editor (mine is VS Code) and open the .env file. Copy the following contents:
REACT_APP_FIREBASE_API_KEY=
REACT_APP_FIREBASE_AUTH_DOMAIN=app-name.firebaseapp.com
Note: CRA requires to have environment variables prefixed with REACT_APP_ (Docs).
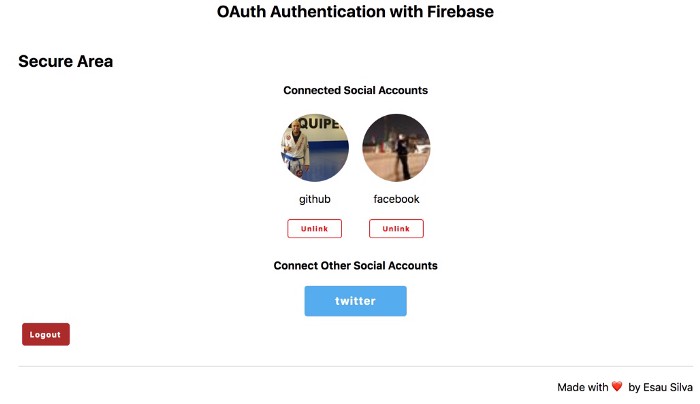
Before we go any further, this is what our app will look like by the end of the tutorial:

Creating our Apps with Firebase and Social Media Providers
As I began typing this part of the tutorial, I realized I was going to include over 20 screenshots and a lot of going back and forth between Firebase and the different providers. To be honest, it was becoming a little confusing so I decided to make a video for this section.
We will be covering the following:
- Setting up our project in Firebase
- Setting up Facebook App
- Setting up Twitter App
- Setting up GitHub App
Follow the link below to watch the video portion of this tutorial and when done, you can come back and continue with the tutorial.
Video: Setting up OAuth with Firebase and Facebook, Twitter and Github
Cleanup, Refactoring and Additions
Back to your editor, delete the following files under the src directory as we are not going to use them for this project.
- App.test.js
- logo.svg
I am not going to go over the CSS as the main focus of this tutorial is React. That being said, replace the contents of App.css with the following
button {
  border: none;
  border-radius: 4px;
  height: 45px;
  background-color: #aaaaaa;
  color: white;
  font-weight: bold;
  font-size: 1rem;
  cursor: pointer;
  letter-spacing: 0.07rem;
  padding: 3px;
  margin: 5px;
}
button:hover {
  background-color: #929292;
}
.hidden {
  display: none;
}
.text--center {
  text-align: center;
}
Replace the contents of index.css with the following
html {
  height: 100%;
  box-sizing: border-box;
  font-size: 100%;
}
*,
*:before,
*:after {
  box-sizing: inherit;
}
body {
  margin: 0;
  padding: 0;
  overflow-x: hidden;
  font-family: -apple-system, BlinkMacSystemFont, 'Segoe UI', Helvetica, Arial,
    sans-serif, 'Apple Color Emoji', 'Segoe UI Emoji', 'Segoe UI Symbol';
}
Install dependencies. Type the following in your terminal
yarn add firebase react-router-dom react-delay
Now create some additional directories. Type the following in your terminal
mkdir src/components src/containers src/firebase
Move App.css and App.js to containers directory.
We should have the following directory structure
|-- public
|   |-- favicon.ico
|   |-- index.html
|   |-- manifest.json
|-- src
|   |-- components
|   |-- containers
|   |   |-- App.css
|   |   |-- App.js
|   |-- firebase
|   |-- index.css
|   |-- index.js
|   |-- registerServiceWorker.js
|-- README.md
|-- package.json
|-- yarn.lock
Open index.js and modify it with the following bolded changes
import React from 'react';
import ReactDOM from 'react-dom';

import './index.css';
import App from './containers/App';
import registerServiceWorker from './registerServiceWorker';

ReactDOM.render(<App />, document.getElementById('root'));
registerServiceWorker();
We are finally done with the refactoring.
Firebase
Create the following files under the src/firebase/ directory. In your terminal type the following
touch src/firebase/firebase.js src/firebase/auth.js src/firebase/index.js
Open firebase.js and copy the following contents
import firebase from 'firebase/app';
import 'firebase/auth';
//import 'firebase/database';

const app = firebase.initializeApp({
  apiKey: process.env.REACT_APP_FIREBASE_API_KEY,
  authDomain: process.env.REACT_APP_FIREBASE_AUTH_DOMAIN
  //databaseURL: process.env.REACT_APP_FIREBASE_DATABASE_URL
});

export default app;
This creates and initializes a Firebase instance. Notice I am only importing firebase/auth since we only need the authentication portion. If you need the Firebase database, uncomment firebase/database import.
We are also assigning the API key and authorization domain to the Firebase instance. Again, if you were to use the database feature, uncomment databaseURL and create that environment variable in the .env file.
Open auth.js and copy the following
import firebase from './firebase';

export const getAuth = () => {
  return firebase.auth();
};

export const githubOAuth = () => {
  return new firebase.firebase_.auth.GithubAuthProvider();
};

export const twitterOAuth = () => {
  return new firebase.firebase_.auth.TwitterAuthProvider();
};

export const facebookOAuth = () => {
  return new firebase.firebase_.auth.FacebookAuthProvider();
};
The first method returns the Firebase Auth Service. From there we can access different interfaces like checking whether a user is currently authenticated, getting the current user, signing out, etc. (Docs).
The following methods (githubOAuth, twitterOAuth and facebookOAuth) return a new instance for each specific provider object. We will use these to authenticate with GitHub, Twitter and Facebook.
Open index.js and copy the following
import firebase from './firebase';
import * as auth from './auth';

export { firebase, auth };
Nothing too exciting here, just exporting firebase and the auth methods. This will allow us to import them in other components like this: import {auth} from ‘./firebase’.
Containers
Create the following files under the src/containers/ directory. In your terminal type the following
touch src/containers/Layout.css src/containers/Layout.js src/containers/withAuthentication.js
Open App.js and replace the contents with the following
import React, { Component } from 'react';
import { BrowserRouter as Router, Route, Switch } from 'react-router-dom';

import Login from '../components/Login';
import Dashboard from '../components/Dashboard';
import About from '../components/About';
import withAuthentication from '../containers/withAuthentication';

import './App.css';

class App extends Component {
  render() {
    return (
      <Router>
        <Switch>
          <Route path="/" exact component={Login} />
          <Route path="/dashboard" component={withAuthentication(Dashboard)} />
          <Route path="/about" component={About} />
        </Switch>
      </Router>
    );
  }
}

export default App;
Notice we are importing several components we have not created yet. Login component will be our landing page where we will have three buttons to authenticate with either GitHub, Twitter or Facebook. We will also have a link to the About component. These two components will not require the user the be authenticated in order to access them.
The Dashboard component will require the user to be authenticated.
withAuthentication is a Higher Order Component (HOC) that will be in charge of validating if the user is authenticated or not. In our case we only require Dashboard to be authenticated, so we use withAuthentication to wrap Dashboard.
Open Layout.css and copy the following
section {
  display: grid;
  grid-template-columns: 1fr minmax(360px, 991px) 1fr;
  grid-template-areas: '. h .' '. c .' '. f .';
  grid-gap: 5px;
  margin-top: 20px;
}
header {
  grid-area: h;
  text-align: center;
}
main {
  grid-area: c;
}
main.content-center {
  display: grid;
  justify-items: center;
}
footer {
  grid-area: f;
  display: grid;
  justify-items: end;
  border-top: 1px solid rgba(34, 36, 38, 0.15);
  margin-top: 20px;
}
Open Layout.js and copy the following
import React from 'react';
import PropTypes from 'prop-types';

import './Layout.css';

const propTypes = {
  children: PropTypes.node.isRequired,
  contentCenter: PropTypes.bool
};

const defaultProps = {
  contentCenter: false
};

const Layout = ({ children, contentCenter }) => {
  return (
    <section>
      <header>
        <h1>OAuth Authentication with Firebase</h1>
      </header>
      <main className={contentCenter ? 'content-center' : ''}>{children}</main>
      <footer>
        <p>
          Made with{' '}
          <span role="img" aria-label="heart emoji">
            ??
          </span>{' '}
          by Esau Silva
        </p>
      </footer>
    </section>
  );
};

Layout.propTypes = propTypes;
Layout.defaultProps = defaultProps;

export default Layout;
First we do some validations with PropTypes. We expect children and contentCenter to be passed in as props.
children is basically the content to be displayed within the layout of the page. If you are not too familiar with this concept, it is used to display everything that is between the opening and closing tags when invoking a component. It will make more sense when we see it in action later. We are also making this prop required.
contentCenter is not required so we assign a default value of false. If true the main content of the layout will be centered.
Since we are using a stateless component we use the destructuring assignment to destructure the props (const Layout = ({ children, contentCenter })) as opposed to using the dot notation on the props object. What follows is some JSX that defines our layout, and finally we assign the propTypes and defaultProps to the Layout component.
Open withAuthentication.js and copy the following
import React, { Component } from 'react';
import Delay from 'react-delay';

import { auth } from '../firebase';

export default WrappedComponent => {
  class WithAuthentication extends Component {
    state = {
      providerData: []
    };

    componentDidMount() {
      auth.getAuth().onAuthStateChanged(user => {
        if (user) {
          this.setState({ providerData: user.providerData });
        } else {
          console.info('Must be authenticated');
          this.props.history.push('/');
        }
      });
    }

    render() {
      return this.state.providerData.length > 0 ? (
        <WrappedComponent
          {...this.props}
          providerData={this.state.providerData}
        />
      ) : (
        <Delay wait={250}>
          <p>Loading...</p>
        </Delay>
      );
    }
  }

  return WithAuthentication;
};
We will wrap any component that needs authentication with withAuthentication.js Higher Order Component or HOC. This component first checks for an authenticated user. If it finds one, then it sets the state to an array of objects in providerData.
providerData comes from Firebase and contains an array of providers that are currently associated with the authenticated user. We will be using some of the information contained in these objects in our wrapped component. Below is an example of what these objects look like
[
   {
      "uid":"857584",
      "displayName":"Esau Silva",
      "photoURL":"https://avatars0.githubusercontent.com/u/9492978?v=4",
      "email":"me@gmail.com",
      "phoneNumber":null,
      "providerId":"github.com"
   }
]
We are also using a new dependency, react-delay to wait 250ms before showing a Loading…message. If we do not wait then the user will see a flashing Loading… message every time, and we do not want that.
If you are not sure what HOCs are, I would recommend reading Understanding React Higher-Order Components by Example to learn more about them
[signupform][/signupform]
Components
Create the following files under the src/components directory. In your terminal type the following
touch src/components/About.js src/components/Dashboard.css src/components/Dashboard.js src/components/Login.js src/components/SocialButtonList.css src/components/SocialButtonList.js src/components/SocialProfileList.css src/components/SocialProfileList.js
Open About.js and copy the following
import React from 'react';

import Layout from '../containers/Layout';

const About = () => {
  return (
    <Layout>
      <h2>About</h2>
      <p>
        Bacon ipsum dolor amet tail landjaeger corned beef chuck hamburger,
        salami strip steak. Pancetta kielbasa ham hock andouille. Tail cupim
        burgdoggen salami bacon jerky shankle strip steak turkey. Drumstick
        shoulder pork loin, filet mignon cupim alcatra tongue jowl. Cupim
        tenderloin rump t-bone. Picanha turducken short loin jowl, landjaeger
        shoulder t-bone buffalo spare ribs salami pastrami tri-tip ground round
        alcatra.
      </p>
    </Layout>
  );
};

export default About;
Simple stateless component that does not require authentication.
Open Login.js and copy the following
import React, { Component } from 'react';
import { Link } from 'react-router-dom';

import Layout from '../containers/Layout';
import SocialButtonList from './SocialButtonList';
import { auth } from '../firebase';

const buttonList = {
  github: {
    visible: true,
    provider: () => {
      const provider = auth.githubOAuth();
      provider.addScope('user');
      return provider;
    }
  },
  twitter: {
    visible: true,
    provider: () => auth.twitterOAuth()
  },
  facebook: {
    visible: true,
    provider: () => auth.facebookOAuth()
  }
};

class Login extends Component {
  componentDidMount() {
    auth.getAuth().onAuthStateChanged(user => {
      if (user) {
        this.props.history.push('/dashboard');
      }
    });
  }

  render() {
    return (
      <Layout contentCenter={true}>
        <p>Connect With</p>
        <SocialButtonList buttonList={buttonList} auth={auth.getAuth} />
        <Link to="/about">About</Link>
      </Layout>
    );
  }
}

export default Login;
This component will be our landing page where the user will see three buttons to log in: GitHub, Twitter and Facebook. Three things to notice here are that we are importing SocialButtonList component (not yet implemented), creating an object assigned to buttonList, and when the component mounts, if the user is authenticated, they will be redirected to the dashboard component.
buttonList represents our social button providers. Each social provider has two properties representing its visibility and the Firebase implementation to authenticate through that specific provider.
SocialButtonList component will receive the list of providers (buttonList) and the Firebase Auth service. This component determines whether each button is visible or not. Also, the component is in charge of the actual authentication.
Below is what the component UI looks like

Open SocialButtonList.css and copy the following
.btn__social--list {
  display: flex;
  flex-wrap: wrap;
  justify-content: center;
}
.btn__social {
  width: 150px;
}
.btn--github {
  background-color: #1b1c1d;
}
.btn--github:hover {
  background-color: #232425;
}
.btn--twitter {
  background-color: #55acee;
}
.btn--twitter:hover {
  background-color: rgb(67, 158, 228);
}
.btn--facebook {
  background-color: #3b5998;
}
.btn--facebook:hover {
  background-color: rgb(45, 77, 146);
}
Open SocialButtonList.js and copy the following
import React from 'react';
import PropTypes from 'prop-types';
import { withRouter } from 'react-router-dom';

import './SocialButtonList.css';

const propTypes = {
  buttonList: PropTypes.shape({
    github: PropTypes.shape({
      visible: PropTypes.bool.isRequired,
      provider: PropTypes.func.isRequired
    }),
    twitter: PropTypes.shape({
      visible: PropTypes.bool.isRequired,
      provider: PropTypes.func.isRequired
    }),
    facebook: PropTypes.shape({
      visible: PropTypes.bool.isRequired,
      provider: PropTypes.func.isRequired
    })
  }).isRequired,
  auth: PropTypes.func.isRequired,
  currentProviders: PropTypes.func
};

const defaultProps = {
  currentProviders: null
};

const SocialButtonList = ({ history, buttonList, auth, currentProviders }) => {
  const authHandler = authData => {
    if (authData) {
      if (currentProviders === null) {
        history.push('/dashboard');
      } else {
        currentProviders(authData.user.providerData);
      }
    } else {
      console.error('Error authenticating');
    }
  };

  const authenticate = (e, provider) => {
    const providerOAuth = buttonList[provider].provider();

    if (!auth().currentUser) {
      auth()
        .signInWithPopup(providerOAuth)
        .then(authHandler)
        .catch(err => console.error(err));
    } else {
      auth()
        .currentUser.linkWithPopup(providerOAuth)
        .then(authHandler)
        .catch(err => console.error(err));
    }
  };

  const renderButtonList = provder => {
    const visible = buttonList[provder].visible;

    return (
      <button
        key={provder}
        className={`btn__social btn--${provder} ${!visible && 'hidden'}`}
        onClick={e => authenticate(e, provder)}
      >
        {provder}
      </button>
    );
  };

  return (
    <div className="btn__social--list">
      {Object.keys(buttonList).map(renderButtonList)}
    </div>
  );
};

SocialButtonList.propTypes = propTypes;
SocialButtonList.defaultProps = defaultProps;

export default withRouter(SocialButtonList);
Before we go further, this is what this component looks like

Note: For this component and the next few ones, I will be breaking them down by sections.
const propTypes = {
  buttonList: PropTypes.shape({
    github: PropTypes.shape({
      visible: PropTypes.bool.isRequired,
      provider: PropTypes.func.isRequired
    }),
    twitter: PropTypes.shape({
      visible: PropTypes.bool.isRequired,
      provider: PropTypes.func.isRequired
    }),
    facebook: PropTypes.shape({
      visible: PropTypes.bool.isRequired,
      provider: PropTypes.func.isRequired
    })
  }).isRequired,
  auth: PropTypes.func.isRequired,
  currentProviders: PropTypes.func
};

const defaultProps = {
  currentProviders: null
};
First we have the propTypes object representing the props this component is expecting. buttonList and auth props are required and currentProviders is optional. Then we assign a default value of null to currentProviders prop
const SocialButtonList = ({ history, buttonList, auth, currentProviders }) => { ... }
Since this component is stateless, we can destructure the props object. Notice we also have history here. This prop is being injected by React Router to the props object; we will be using it later to navigate to a different page.
const authHandler = authData => {
  if (authData) {
    if (currentProviders === null) {
      history.push('/dashboard');
    } else {
      currentProviders(authData.user.providerData);
    }
  } else {
    console.error('Error authenticating');
  }
};
This function is called after we have called Firebase API to authorize the user and handles the authorization (basically what happens after the user logs in). Now, if you recall, so far we have only called this component from the Login component and from there we are only passing the required props, which means that currentProviders prop will be null, so we call history and navigate to the Dashboard component (not yet implemented).
When this component is called within the Dashboard component, it means we are connecting another social profile, so we call the callback function prop currentProviders and update the list of connected social accounts.
authData is an object that comes from Firebase that looks like this
{
  additionalUserInfo: {...},
  credential: {...},
  operationType: "signIn",
  user: {
    ...,
    providerData: [   // We are only interested in this array
      {
        ...,
        providerId: "github.com"
      },
      ...
    ],
    ...
  }
}
providerData is an array of objects which contains the connected social accounts associated to the current user.
const authenticate = (e, provider) => {
  const providerOAuth = buttonList[provider].provider();

  if (!auth().currentUser) {
    auth()
      .signInWithPopup(providerOAuth)
      .then(authHandler)
      .catch(err => console.error(err));
  } else {
    auth()
      .currentUser.linkWithPopup(providerOAuth)
      .then(authHandler)
      .catch(err => console.error(err));
  }
};
This is the function we call when someone clicks one of the social buttons to login or to connect another social account to their profile.
In the buttonList prop object we have the Firebase function to call each specific provider OAuth method, and we use it to sign in or link another provider to the current user.
const renderButtonList = provder => {
  const visible = buttonList[provder].visible;

  return (
    <button
      key={provder}
      className={`btn__social btn--${provder} ${!visible && 'hidden'}`}
      onClick={e => authenticate(e, provder)}
    >
      {provder}
    </button>
  );
};
Now we have a render method that loops over the connected providers and displays each social button to log in or connect another provider to the current user. This is where we call the authenticate method.
return (
  <div className="btn__social--list">
    {Object.keys(buttonList).map(renderButtonList)}
  </div>
);
Finally we return the list of social buttons.
Open SocialProfileList.css and copy the following
.btn__profiles--list {
  display: flex;
  flex-wrap: wrap;
  justify-content: center;
}
.container__profile {
  display: flex;
  flex-direction: column;
  align-items: center;
  margin: 10px;
}
.container__profile--photo {
  border-radius: 50%;
  width: 100px;
  height: 100px;
}
.container__profile--btn {
  font-size: 0.65rem;
  width: 80px;
  height: 28px;
  background-color: transparent;
  border: 1px solid red;
  color: red;
}
.container__profile--btn:hover {
  background-color: red;
  color: white;
}
Open SocialProfileList.js and copy the following
import React, { PureComponent, Fragment } from 'react';
import PropTypes from 'prop-types';

import './SocialProfileList.css';

class SocialProfileList extends PureComponent {
  static propTypes = {
    auth: PropTypes.func.isRequired,
    providerData: PropTypes.arrayOf(PropTypes.object).isRequired,
    unlinkedProvider: PropTypes.func.isRequired
  };

  /**
   * Unlinks a provider from the current user account
   */
  handleProviderUnlink = async (e, provider) => {
    const { auth, unlinkedProvider } = this.props;

    if (window.confirm(`Do you really want to unlink ${provider}?`)) {
      const providers = await auth()
        .currentUser.unlink(`${provider}.com`)
        .catch(err => console.error(err));

      unlinkedProvider(provider, providers.providerData);
    }
  };

  renderProfileList = ({ providerId, photoURL }) => {
    const providerName = providerId.split('.')[0];

    return (
      <div className="container__profile" key={providerName}>
        <img
          src={photoURL}
          alt={providerName}
          className="container__profile--photo"
        />
        <p>{providerName}</p>
        <button
          className="container__profile--btn"
          onClick={e => this.handleProviderUnlink(e, providerName)}
        >
          Unlink
        </button>
      </div>
    );
  };

  render() {
    return (
      <Fragment>
        <p className="text--center">
          <strong>Connected Social Accounts</strong>
        </p>
        <div className="btn__profiles--list">
          {this.props.providerData.map(this.renderProfileList)}
        </div>
      </Fragment>
    );
  }
}

export default SocialProfileList;
This is what the SocialProfileList looks like

class SocialProfileList extends PureComponent {
  static propTypes = {
    auth: PropTypes.func.isRequired,
    providerData: PropTypes.arrayOf(PropTypes.object).isRequired,
    unlinkedProvider: PropTypes.func.isRequired
  };
  ...
}
This component is only called from the Dashboard component, which we will implement next. Notice for this component I am extending PureComponent as opposed to Component and that is because I want React to do shallow prop comparison and don’t waste renders (React.PureComponent).
Then we have the component’s props, all of which of them are required. auth gives us the Firebase Auth service, which we will use to get the current user. providerData is an array of objects that contains the connected social accounts for the current user. unlinkedProvider is a callback function that unlinks or disconnects, a provider from the current user.
handleProviderUnlink = async (e, provider) => {
  const { auth, unlinkedProvider } = this.props;

  if (window.confirm(`Do you really want to unlink ${provider}?`)) {
    const providers = await auth()
      .currentUser.unlink(`${provider}.com`)
      .catch(err => console.error(err));

    unlinkedProvider(provider, providers.providerData);
  }
};
This method gets the current user, then unlinks a connected social account by provider name, then calls the function callback and passes back the unlinked provider and the providers associated with the current user. This will make more sense when we implement the Dashboard component.
renderProfileList = ({ providerId, photoURL }) => {
  const providerName = providerId.split('.')[0];

  return (
    <div className="container__profile" key={providerName}>
      <img
        src={photoURL}
        alt={providerName}
        className="container__profile--photo"
      />
      <p>{providerName}</p>
      <button
        className="container__profile--btn"
        onClick={e => this.handleProviderUnlink(e, providerName)}
      >
        Unlink
      </button>
    </div>
  );
};
This method renders a connected profile to the page by displaying the user’s profile photo, provider name and an Unlink button where we call the handleProviderUnlink method.
render() {
  return (
    <Fragment>
      <p className="text--center">
        <strong>Connected Social Accounts</strong>
      </p>
      <div className="btn__profiles--list">
        {this.props.providerData.map(this.renderProfileList)}
      </div>
    </Fragment>
  );
}
render method that maps over the user’s connected social accounts and displays them.
Open Dashboard.css and copy the following
.btn__logout {
  width: 70px;
  height: 33px;
  font-size: 0.7rem;
  background-color: rgb(172, 43, 43);
}
.btn__logout:hover {
  background-color: rgb(197, 63, 63);
}
Open Dashboard.js and copy the following
import React, { Component } from 'react';
import PropTypes from 'prop-types';

import Layout from '../containers/Layout';
import SocialButtonList from './SocialButtonList';
import SocialProfileList from './SocialProfileList';
import { auth } from '../firebase';

import './Dashboard.css';

class Dashboard extends Component {
  static propTypes = {
    providerData: PropTypes.arrayOf(PropTypes.object).isRequired
  };

  static defaultProps = {
    providerData: []
  };

  state = {
    buttonList: {
      github: {
        visible: true,
        provider: () => {
          const provider = auth.githubOAuth();
          provider.addScope('user');
          return provider;
        }
      },
      twitter: {
        visible: true,
        provider: () => auth.twitterOAuth()
      },
      facebook: {
        visible: true,
        provider: () => auth.facebookOAuth()
      }
    },
    providerData: this.props.providerData
  };

  componentDidMount() {
    this.updateProviders(this.state.providerData);
  }

  handleCurrentProviders = providerData => {
    this.updateProviders(providerData);
  };

  updateProviders = providerData => {
    let buttonList = { ...this.state.buttonList };

    providerData.forEach(provider => {
      const providerName = provider.providerId.split('.')[0];
      buttonList = this.updateButtonList(buttonList, providerName, false);
    });

    this.setState({ buttonList, providerData });
  };

  handleUnliknedProvider = (providerName, providerData) => {
    if (providerData.length < 1) {
      auth
        .getAuth()
        .currentUser.delete()
        .then(() => console.log('User Deleted'))
        .catch(() => console.error('Error deleting user'));
    }

    let buttonList = { ...this.state.buttonList };
    buttonList = this.updateButtonList(buttonList, providerName, true);

    this.setState({ buttonList, providerData });
  };

  updateButtonList = (buttonList, providerName, visible) => ({
    ...buttonList,
    [providerName]: {
      ...buttonList[providerName],
      visible
    }
  });

  render() {
    return (
      <Layout>
        <h1>Secure Area</h1>
        <SocialProfileList
          auth={auth.getAuth}
          providerData={this.state.providerData}
          unlinkedProvider={this.handleUnliknedProvider}
        />
        <p style={{ textAlign: 'center' }}>
          <strong>Connect Other Social Accounts</strong>
        </p>
        <SocialButtonList
          buttonList={this.state.buttonList}
          auth={auth.getAuth}
          currentProviders={this.handleCurrentProviders}
        />
        <button
          className="btn__logout"
          onClick={() => auth.getAuth().signOut()}
        >
          Logout
        </button>
      </Layout>
    );
  }
}

export default Dashboard;
This is our last and biggest component, and where we display the list of connected social media accounts and the list of social media buttons. This is what the UI looks like
static propTypes = {
  providerData: PropTypes.arrayOf(PropTypes.object).isRequired
};

state = {
  buttonList: {
    github: {
      visible: true,
      provider: () => {
        const provider = auth.githubOAuth();
        provider.addScope('user');
        return provider;
      }
    },
    twitter: {
      visible: true,
      provider: () => auth.twitterOAuth()
    },
    facebook: {
      visible: true,
      provider: () => auth.facebookOAuth()
    }
  },
  providerData: this.props.providerData
};
This component only takes one prop, providerData array of objects and is required.
For state we need the list of social buttons and the list of providers. Notice I am initializing the providers with the providerData props. If you remember, we are wrapping Dashboard component with withAuthentication HOC, this is where this component gets the provider data props.
componentDidMount() {
  this.updateProviders(this.state.providerData);
}

handleCurrentProviders = providerData => {
  this.updateProviders(providerData);
};
We use the provider data to update the visibility of the social buttons and social profiles when the component mounts and also when we either link another social account to the current user or unlink one.
updateProviders = providerData => {
  let buttonList = { ...this.state.buttonList };

  providerData.forEach(provider => {
    const providerName = provider.providerId.split('.')[0];
    buttonList = this.updateButtonList(buttonList, providerName, false);
  });

  this.setState({ buttonList, providerData });
};
First we make a copy of the button list (remember that by default all of the buttons have a visibility of true) then we loop over the providers associated with the current user and change the visibility to false by calling updateButtonList method, that way we only display only the buttons that are not associated with the current user. Finally we set the state with the new buttons list and provider data. This will trigger a re-render and show the correct profiles and buttons to the user.
handleUnlinkedProvider = (providerName, providerData) => {
  if (providerData.length < 1) {
    auth
      .getAuth()
      .currentUser.delete()
      .then(() => console.log('User Deleted'))
      .catch(() => console.error('Error deleting user'));
  }

  let buttonList = { ...this.state.buttonList };
  buttonList = this.updateButtonList(buttonList, providerName, true);

  this.setState({ buttonList, providerData });
};
This is our callback function that we call from SocialProfileList component when we unlink a social media account.
If the provider data is less than 1, then that means the current user has disconnected all of their social media accounts, so we delete the user and consequently the user gets logged out and sent back to the login screen. Otherwise we make a copy of the current button list, then update the visibility to true of the unlinked provider and set the state to the new button list and provider data.
updateButtonList = (buttonList, providerName, visible) => ({
  ...buttonList,
  [providerName]: {
    ...buttonList[providerName],
    visible
  }
});
This method updates the visibility of the button list.
render() {
  return (
    <Layout>
      <h1>Secure Area</h1>
      <SocialProfileList
        auth={auth.getAuth}
        providerData={this.state.providerData}
        unlinkedProvider={this.handleUnlinkedProvider}
      />
      <p style={{ textAlign: 'center' }}>
        <strong>Connect Other Social Accounts</strong>
      </p>
      <SocialButtonList
        buttonList={this.state.buttonList}
        auth={auth.getAuth}
        currentProviders={this.handleCurrentProviders}
      />
      <button
        className="btn__logout"
        onClick={() => auth.getAuth().signOut()}
      >
        Logout
      </button>
    </Layout>
  );
}
Render to the screen our list of social media profiles, social media buttons and a logout button.
Now you can start the application by typing the following in your terminal, and this is what the app should look like.
yarn start
Bonus! Production Deployment to Heroku
In your terminal, type the following to create a client directory within the root of the project
mkdir client
Now, open the project directory in Finder or Windows Explorer and move everything to the client directory, except for the .gitignore file.
Back to your terminal, type the following within the root of the project
yarn init -y
yarn add express
touch server.js
You should have the following top level directory structure
|-- .gitignore
|-- client
|-- node_modules
|-- package.json
|-- server.js
|-- yarn.lock
Open package.json and add the following scripts section
{
  ...,
  "scripts": {
    "dev:client": "cd client && yarn start",
    "dev:server": "cd client && yarn build && cd .. && yarn start",
    "start": "node server.js",
    "heroku-postbuild": "cd client && npm install && npm install --only=dev --no-shrinkwrap && npm run build"
  },
  ...
}
dev:client: Start the app in development modedev:server: Create a production build, then have Express serve the appstart: Heroku will run this script by default and start our appheroku-postbuild: Instructs Heroku to build our client app
Open server.js and copy the following
const express = require('express');
const path = require('path');

const app = express();

const PORT = process.env.PORT || 5000;

// Serve any static files
app.use(express.static(path.join(__dirname, 'client/build')));

// Handle React routing, return all requests to React app
app.get('*', function(req, res) {
  res.sendFile(path.join(__dirname, 'client/build', 'index.html'));
});

app.listen(PORT, () => console.log(`Listening on port ${PORT}`));
This simple Express server will serve our app.
Now, head over to Heroku and log in (or create an account if you don’t have one).
Create a new app and give it a name
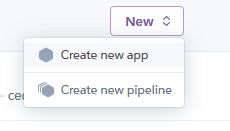
New Heroku app
Click on the Deploy tab and follow the deploy instructions (which I think are pretty self-explanatory…no point on replicating them here)
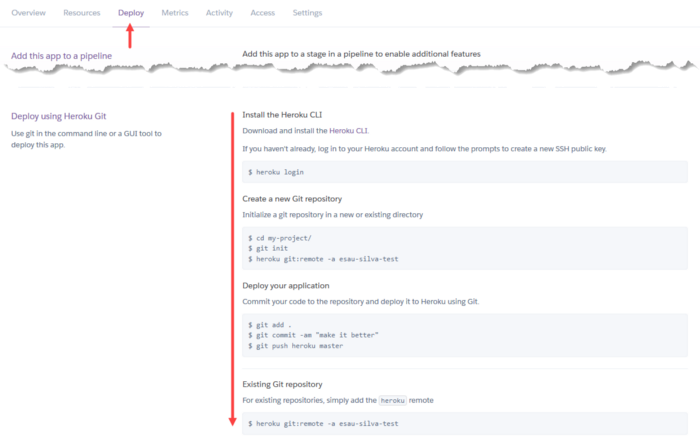
And that is it! You can open the app by clicking on the Open app button at the top right corner within the Heroku dashboard for the app.
Conclusion
You made it to the end. Congratulations 🙂 You can get the full code on the GitHub repository.
Thank you for reading and I hope you enjoyed it. If you have any questions, suggestions or corrections let me know in the comments below. Don’t forget to give this article a share and you can follow me on Twitter, GitHub or Medium.
Originally posted on Bits and Pieces
[bottomads][/bottomads]